How To Install Argent Job Scheduler
This section explains the step-by-step procedure for installing the Argent Job Scheduler.
Before customers begin, please note:
-
Installation takes less than 2 minutes.
-
Customers must be logged on under an account that is in the Administrators group.
-
No reboot is needed.
All customers’ existing Job Classes, etc. will be retained if the Upgrade path is used but will not be retained if the product is de-installed then re-installed.
Run SETUP.EXE
Follow these easy steps to install the Argent Job Scheduler.
Step 1:
Run SETUP.EXE from Windows Explorer or from the Start Menu (Type: X:\_ARGENT_INSTALL\SETUP.EXE)
Step 2:
Default summary information for current account, current domain, current node, and node to be installed on is displayed – see below, Summary Information for Node.
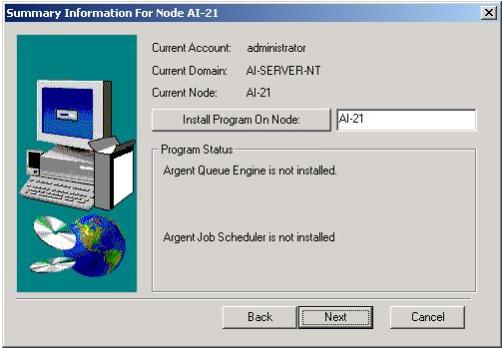
If customers want to install the Argent Job Scheduler on a node other than the currently displayed local node, enter the node name and click the Install Program On Node button.
Click on Next.
Step 3:
Click on radio button to select type of operation – see below, Install/Remove window.
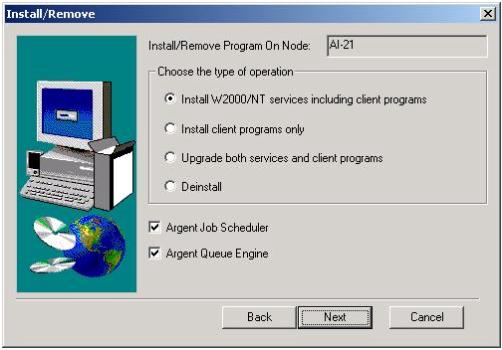
-
Install NT/200x Services Including Client Programs – Use this option to install both the server and the client programs. [The Argent Job Scheduler files are client programs and the queue engine files are server programs].
-
Install Client Programs Only – Use this option to install only the client program files; in this instance, the Argent Job Scheduler files.
-
Upgrade both services and client programs – Use this option to upgrade an existing installation with a newer version (page 15).
-
Deinstall – Use this option to deinstall the job scheduler or queue engine.
Click on Next
NOTE: Windows 200x Services typically are programs that operate in the background or “behind the scenes” such as network, communication and administrative processes. Services are accessible through Windows 200x Control Panel or Administrative Tools folder.
The Argent Job Scheduler is installed as a W200x service, but it also has an intuitive Graphical User Interface (GUI). Once installed, customers can easily administer the Argent Job Scheduler service using the Argent Job Scheduler Manager.
-
Check the Scheduling Engine and Queue Engine check boxes. This is necessary if customers are upgrading or reinstalling the software. If either of the two is already installed, then deselect the one that is already installed.
Note: The node on which the Argent Job Scheduler will be installed is the local node on which setup is running (Default).
Step 4:
Input Directory: The directory where SETUP will locate the Argent Job Scheduler files to install. By default, this is the current directory from which SETUP is running.
Output Directory: The directory to which the Argent Job Scheduler and Argent Queue Engine will be installed. By default, this is a directory named “\Argent\ScheduleEngine\” and “\Argent\QueueEngine” on the C: drive.
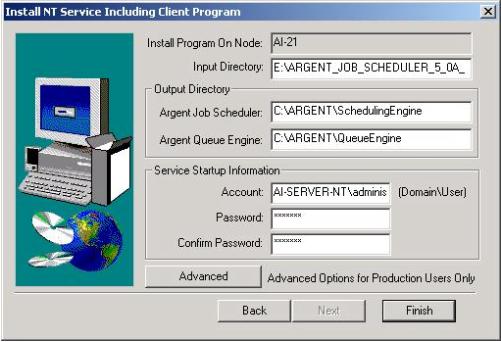
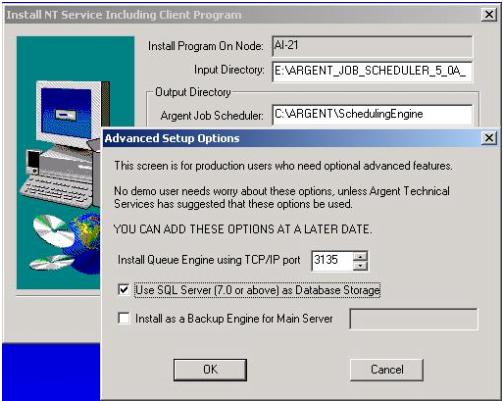
Customers who want to use the SQL backend should click on the ‘Advanced’ button to select the option.
Argent Job Scheduler Service Startup Information
Windows NT/200x account for the user that is currently logged on. This is the account that the Argent Job Scheduler will use and, by default, is the same as the current user.
Password
Enter and confirm customers Password by typing it in the specified boxes. This is the Windows NT/200x password for the Account Name, which the Argent Job Scheduler will be using. If customers changed the Account Name in Step 2, be sure to use the correct (corresponding) password.
CAUTION: Customers must enter a password for the Argent Job Scheduler to operate.
Click on Finish.
SETUP will confirm the Install directory, and the Argent Job Scheduler will be installed in the specified output directory on the specified node.
CAUTION: Changing the Input Directory will force setup to look for source files elsewhere! Typically, this SHOULD NOT be changed.
Step 5:
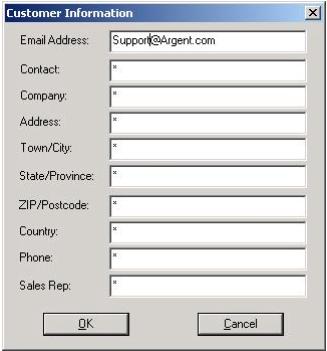
Enter the customer information. Entering the accurate information is important as Argent Job Scheduler engine uses this information to contact you in the vital conditions such as license is about to expire.
Step 6:
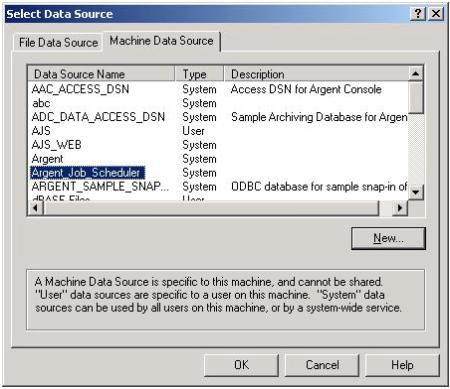
If the SQL backend is selected the ODBC DSN prompt is displayed.
Step 7:
Proceed to complete the installation.
|
Your Argent Job Scheduler is a critical production system, the well-being of which directly affects large segments of your IT operation. Feel free at any time, day or night, 24 hours-a-day, 365 days-a-year to contact Argent
|