KBI 311087 Argent WorldView User Guide
Version
Argent WorldView all versions
Date
Friday, 15 Nov 2019
Summary
User Guide for Argent WorldView
Technical Background
Argent WorldView is a Web 2.0 application that integrates with all of your existing Argent Job Scheduler installations and serves as a web interface for the schedulers
By introducing Argent Job Scheduler into a web GUI, customers no longer have to remote login to the Argent server
It also overcomes the limitation on the number of users accessing the data through remote desktop or the pain of installing the Argent Job Scheduler Client GUI on user desktops
Argent WorldView integrates the Argent Job Scheduler GUI and the Queue Engine functionalities into one single web console and makes Argent Job Scheduler more scalable
Once installed, Argent WorldView can be browsed from anywhere, provided you have the sufficient access rights
Supported Browsers: IE 9 and above, Firefox, Chrome, Safari
Supported Devices: Standard computers, Tablets, Smartphones
Adding a Scheduling Engine
To list a Scheduling Engine in the Argent WorldView Website
- Argent WorldView Web Service must be installed on the machine where the Scheduling Engines that are to be listed in the Argent WorldView Website reside
If there are multiple Scheduling Engines to be listed, Argent WorldView Web Service must be installed on each of their servers
- These Scheduling Engines must be configured in the Argent WorldView Website
If the Web Service and the Website are both installed on the same machine, Argent WorldView Website automatically lists the local Scheduling Engine
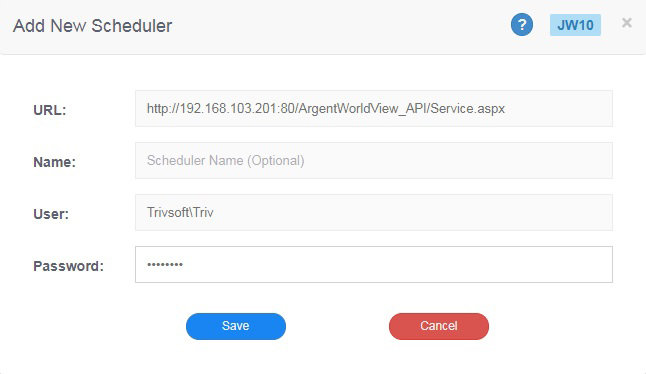
Multiple Scheduling Engines can be added using the ‘Add New Scheduler’ button at the bottom of the left pane

The URL and User details must be specified in the ‘Add New Scheduler’ screen (JW10)
The Name field is optional and is used to provide an alias name for the Scheduler
If it is not specified, the default name of the Scheduler will be displayed in the screens
Working
Argent WorldView communicates with respective Argent Job Scheduler database and provides information to the Web GUI in user specified format
Scheduling Engines installed on different machines can be integrated into a single web console
All Queue Engines connected for each Scheduling Engine are also listed
Argent WorldView provides the following functionalities
- Job status listing for the associated Scheduling Engines (JW1)
- Scheduling Engine-wise listing of Jobs (JW2)
- Queue Engine-wise listing of Jobs (JW3)
- Drill down option to the respective Job instances from JW2 and JW3 screens
- JW4 screen provides all of the functionalities that the J1 screen of Argent Job Scheduler Windows GUI has
- Scheduling Engine-wise listing of Archived Jobs (JW5)
- Create, configure, and delete Job Templates (JW14)
- Control Panel (JW24) to create, configure, and delete Alerts, Macros, and Calendars
- Administration screen (JW16) for configuring general and security settings
The following screens explain the working of Argent WorldView
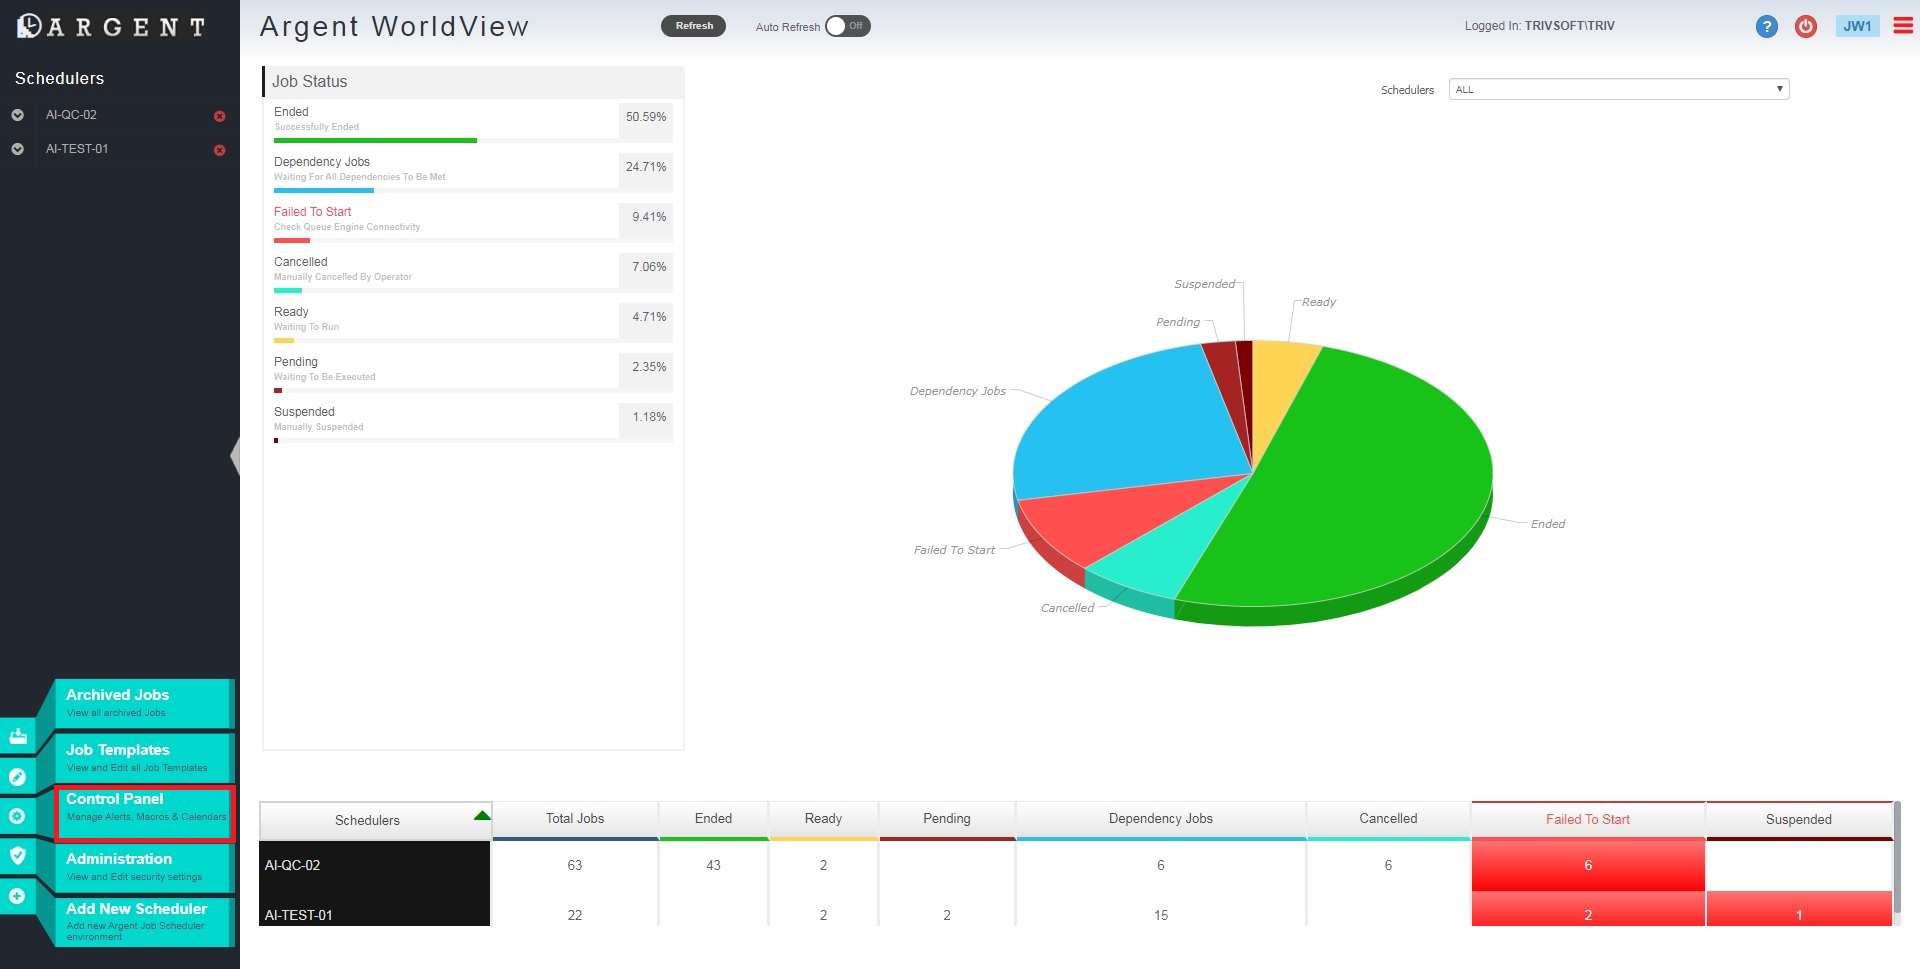
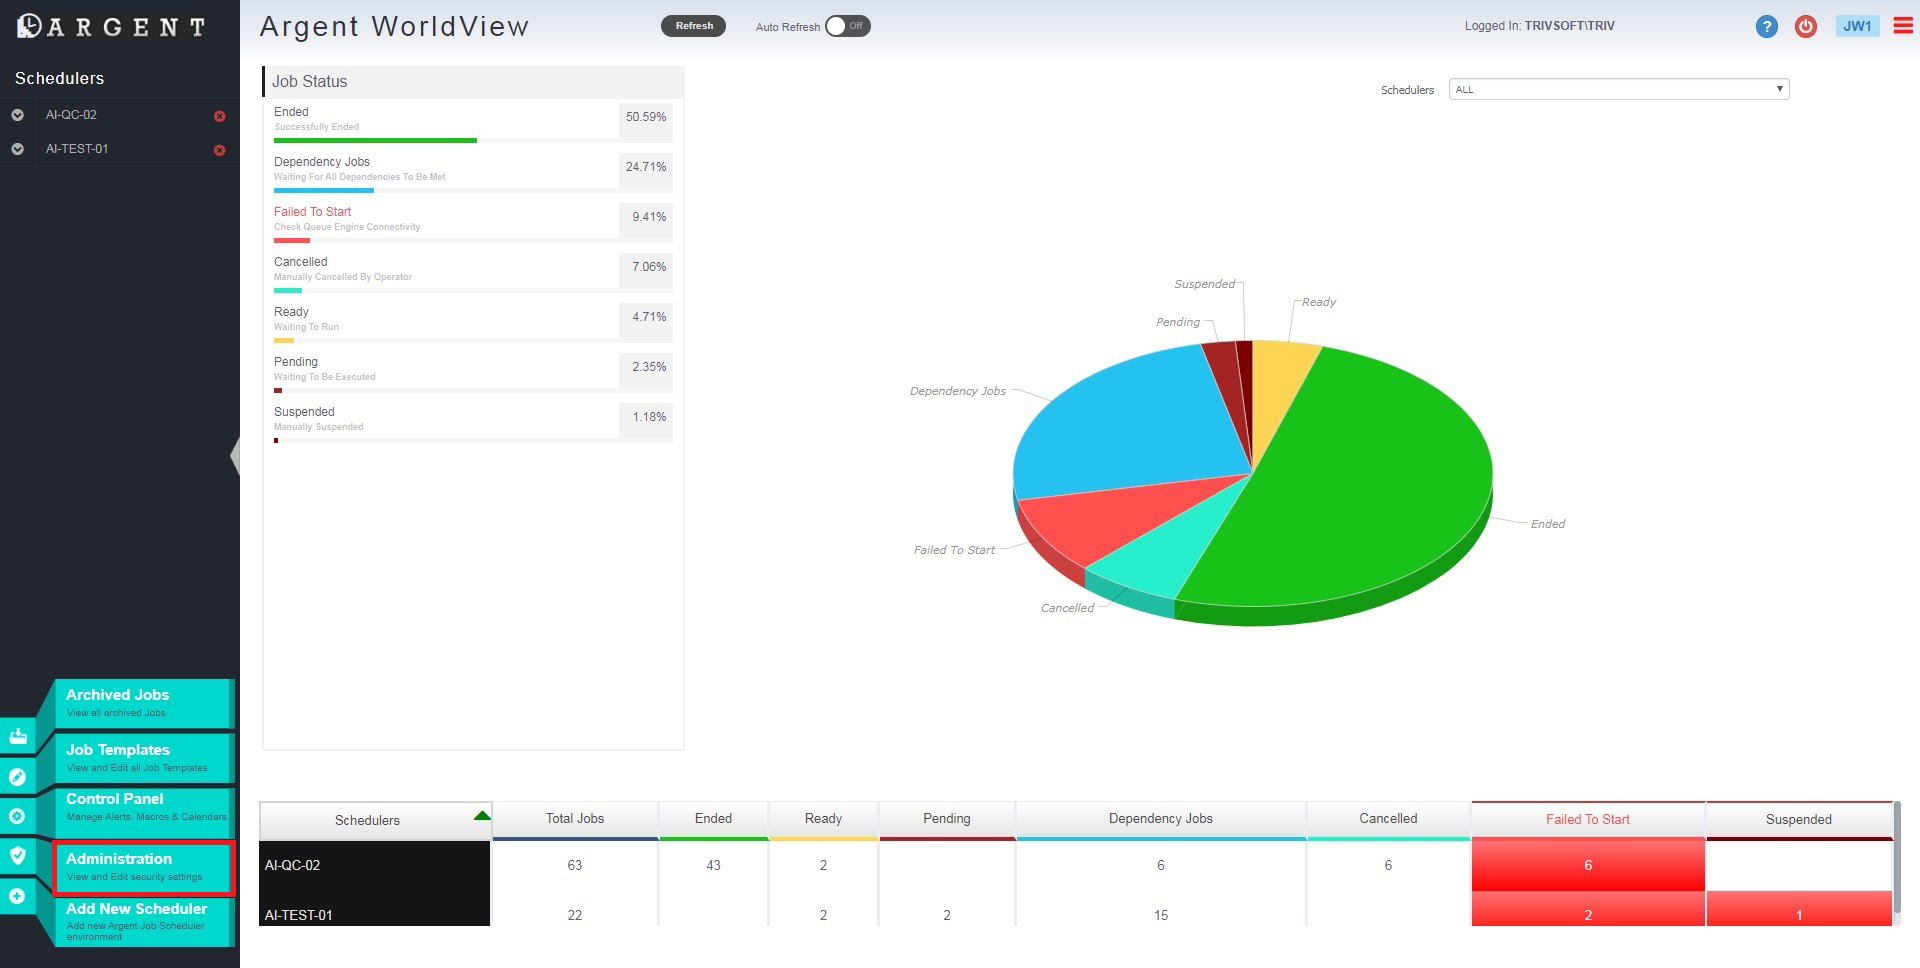
Default Screen (JW1) – Listing Job Status of All Registered Scheduling Engines

The default JW1 screen displays the summary Job status (Ended, Running, Ready, Held, Dependency, Failed to Start, Aborted, etc.) of all Scheduling Engines in percentage as well as in a Pie Chart form
The Scheduling Engine whose Job status is to be displayed can be selected from the ‘Schedulers‘ combo box on the screen
All screens get refreshed every 30 seconds by default
This refresh time is configurable, and there is also an option at the top of the screens to enable or disable Auto Refresh
A Logout button is also provided to logout from the Argent WorldView Website
To unregister a Scheduling Engine, click the (x) option near to the Scheduling Engine in the tree
If it is deleted, all associated Queue Engines will also be deleted

The ‘Settings’ button allows the customer to enable or disable paging
If it is enabled, customers can set the maximum number of ‘Records Per Page’ so that each page will contain only the specified number of records
The maximum number of records per page is limited to 1,000
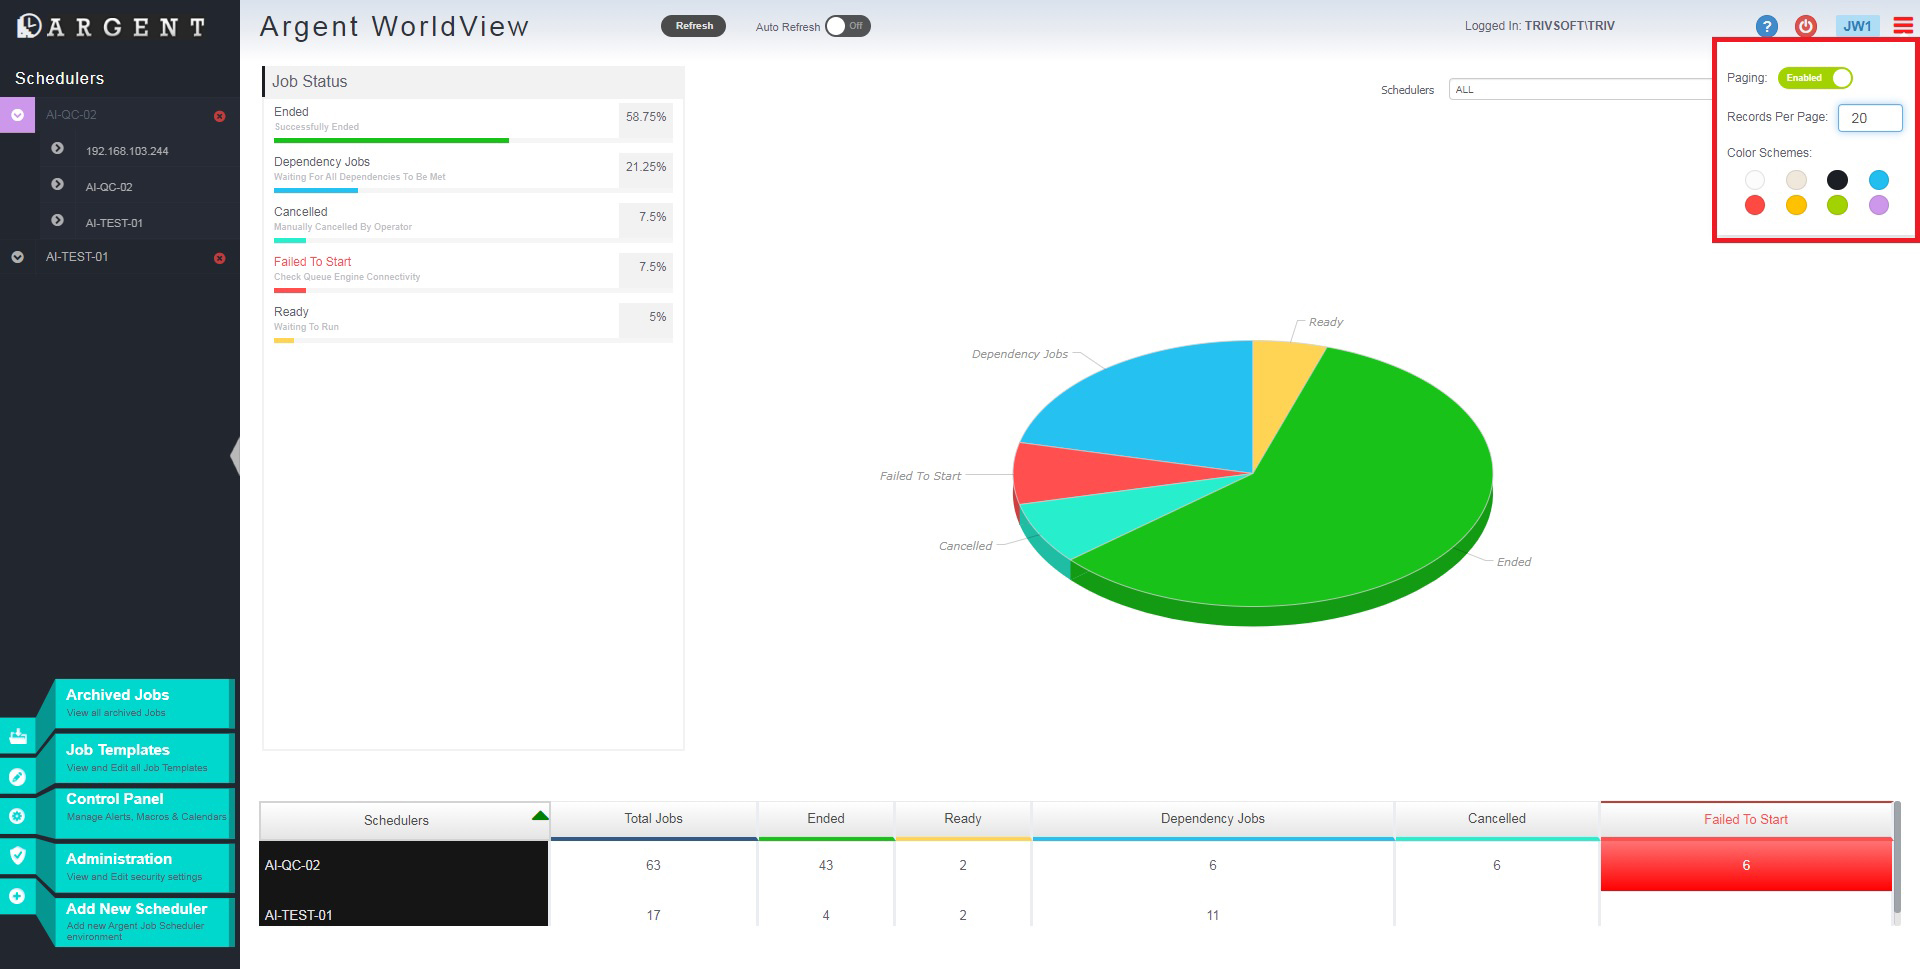
If the paging is disabled but the number of records exceeds 1000, the paging will be enabled automatically
The table at the bottom of the JW1 screen lists each Scheduling Engine in separate rows, showing the number of Jobs under each status
Double clicking the row will load the JW2 screen if the option set in the View Mask filter is Summary View, otherwise the JW4 screen is loaded
The JW2 screen allows Scheduling Engine-wise listing of Jobs
JW2 Screen – Scheduling Engine-Wise Listing of Jobs (Jobs Are Grouped)

This screen displays information of all Jobs associated with the selected Scheduling Engine, such as the Job name, the Queue in which the Job is put into, the Queue Engine on which the Job is run, the completed and total count of Jobs, last run time of its instance, next run time of its instance and the average execution time
On clicking the ‘Job Template’ cell, a small pop-up appears that shows the number of instances of that Job in four different statuses (Ready, Held, Dependency, and Others)
If there are any Jobs in Ready status, then, on mouse over, the Ready button of the pop-up screen changes to Hold Jobs
All the instances of the selected Job which are in Ready status can be put to Held status by clicking the Hold Jobs button
Similarly, if there are any Jobs in Dependency status, then, on mouse over, the Dependency button of the pop-up screen changes to Hold Jobs
All the instances of the selected Job in Dependency status can be put to Held mode by clicking the Hold Jobs button
The reverse happens with the Held button of the pop-up screen
If there are any Jobs in Held status, then, on mouse over, the name changes to Release Jobs
Clicking the button will release all of the Held instances of the Job
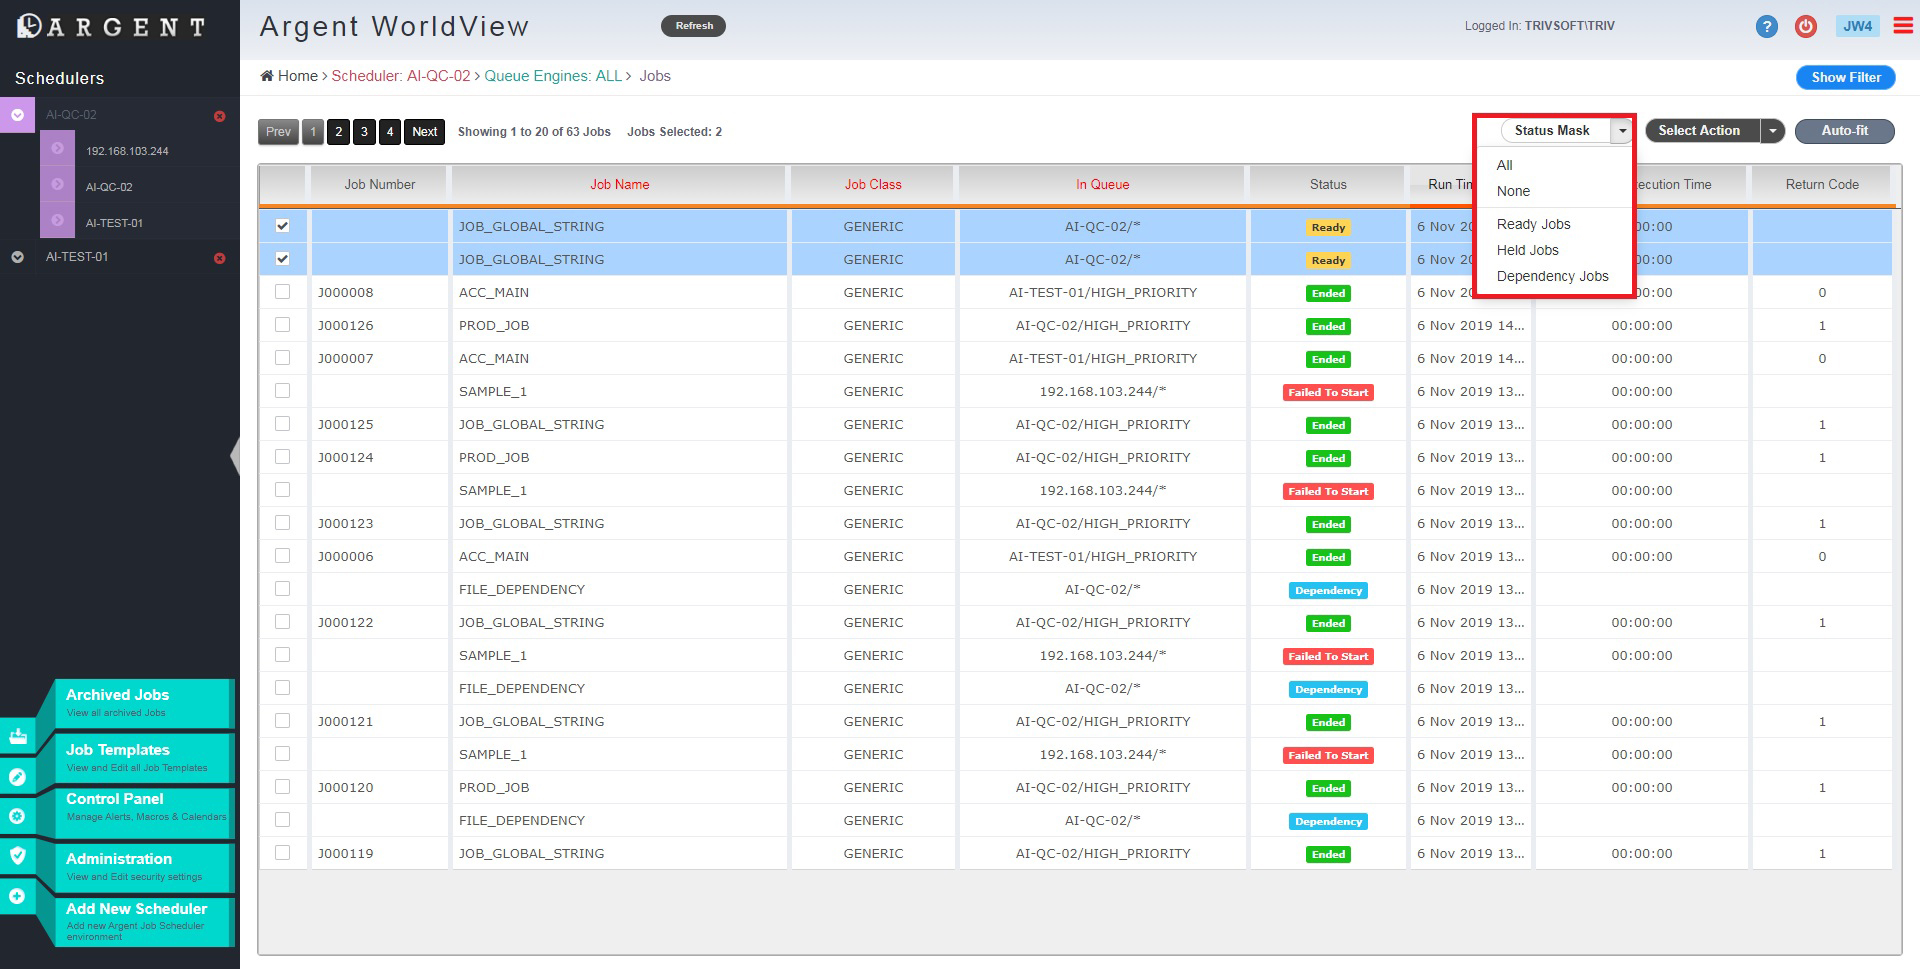
The ‘Show Filter’ option is used for filtering Jobs
This option is available in the JW2, JW3, and JW4 screens
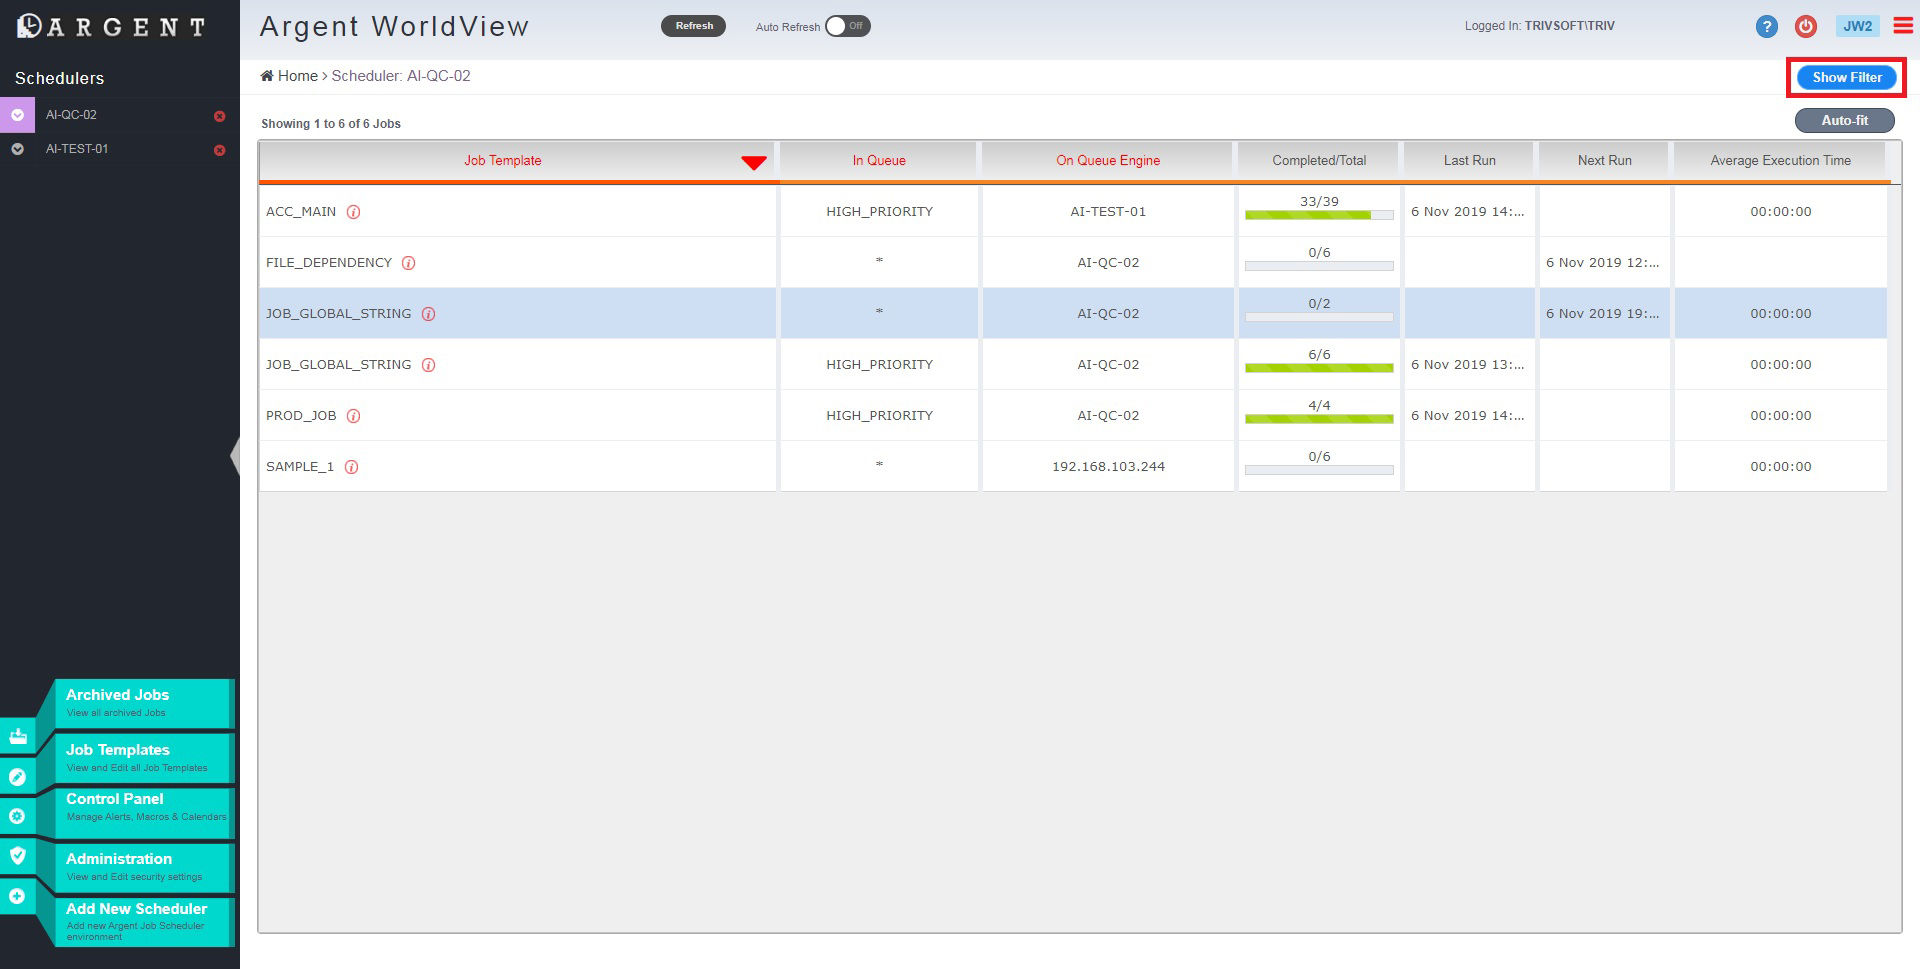
There are 5 sections available for filtering the scheduled Jobs: View Mask, Queue Engine Mask, Job Mask, Job Status Mask, and Date Mask
Using these options, Jobs are filtered with respect to the Queue Engines, Job name, Job status, date of occurrence, etc
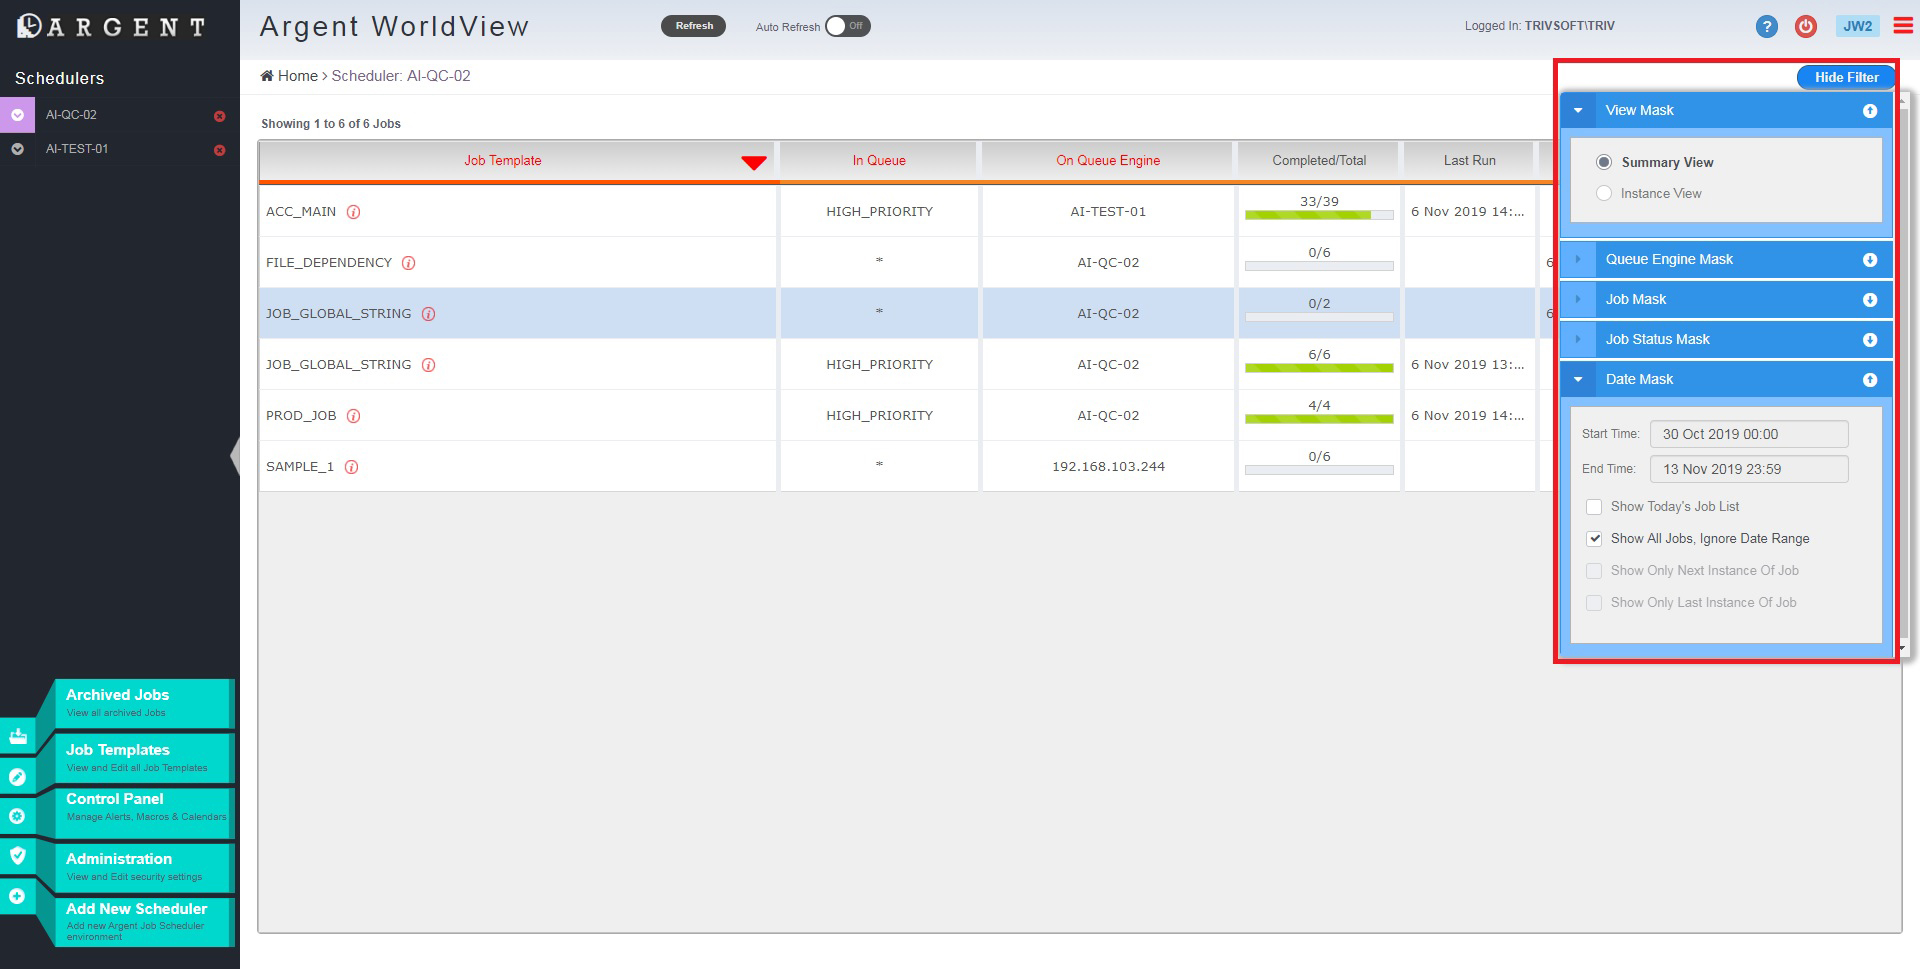
The View Mask filter can be used to switch between the Summary View and Instance View
In the Summary View, the summary of all instances of a Job is displayed
In the Instance View, details of each instance of the Job are displayed
The choice made in the View Mask filter is persistent
The filter option can also show the current day’s Jobs, the next instance of every Job, and the last instance of all completed Jobs
The ‘Show Only Next Instance of Job’ and ‘Show Only Last Instance of Job’ options are enabled only in the Instance View (i.e., in the JW4 screen)
The ‘Auto-fit’ option at the top of the screens is for resizing the column width to its default position
Double clicking the Job will open the JW4 screen where the instances of the selected Job are displayed
JW3 Screen – Queue Engine-Wise Listing of Jobs (Jobs Are Grouped)
Clicking the Queue Engine node from the tree in the left pane opens the JW3 screen (provided the option set in the View Mask filter is Summary View, otherwise the JW4 screen is loaded)
Information about all Jobs associated with the selected Queue Engine are displayed in this screen, including Job name, Queue in which the Job is put into, Queue Engine on which the Job is run, the completed and total count of Job instances, last run time of its instance, next run time of its instance, and the average execution time
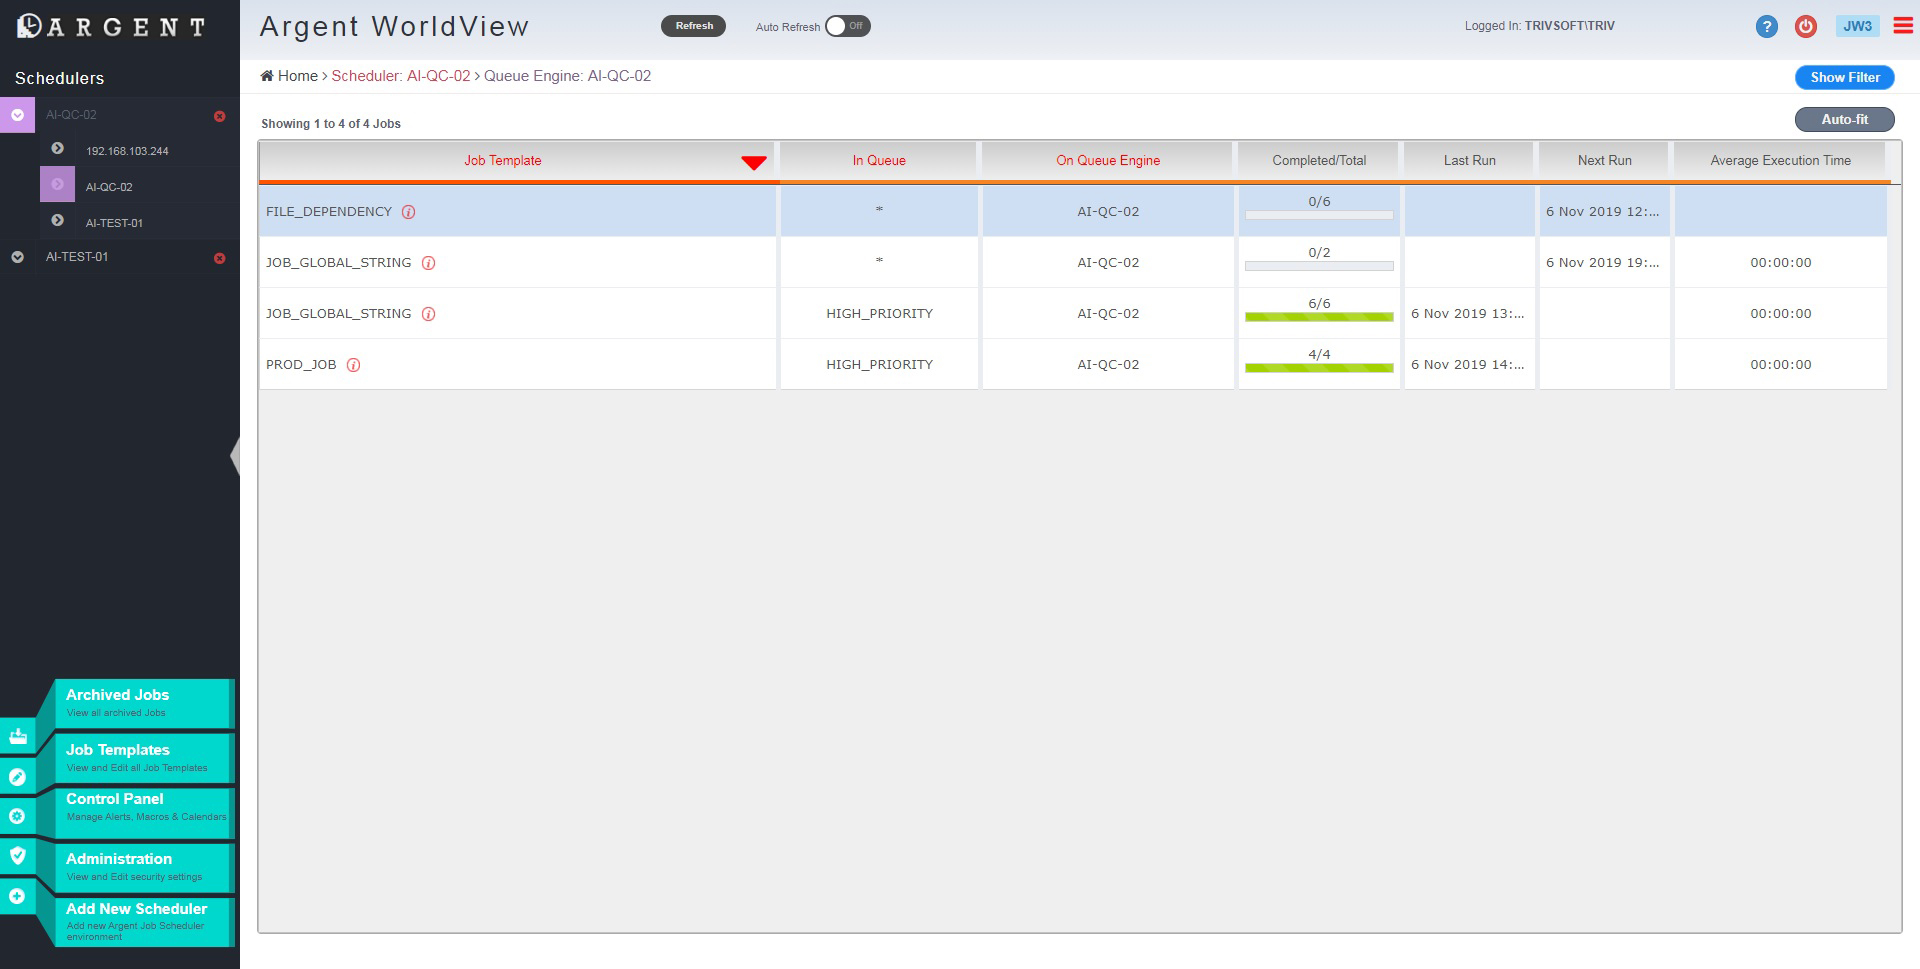
Identical to the JW2 screen, on clicking the ‘Job Template’ cell a small pop-up screen appears that shows the number of instances of that Job in four different statuses (Ready, Held, Dependency, and Others)
Features like putting Job instances to Held status and releasing them are also identical to the JW2 screen
Double clicking a Job opens the JW4 screen where the instances of the selected Job are displayed
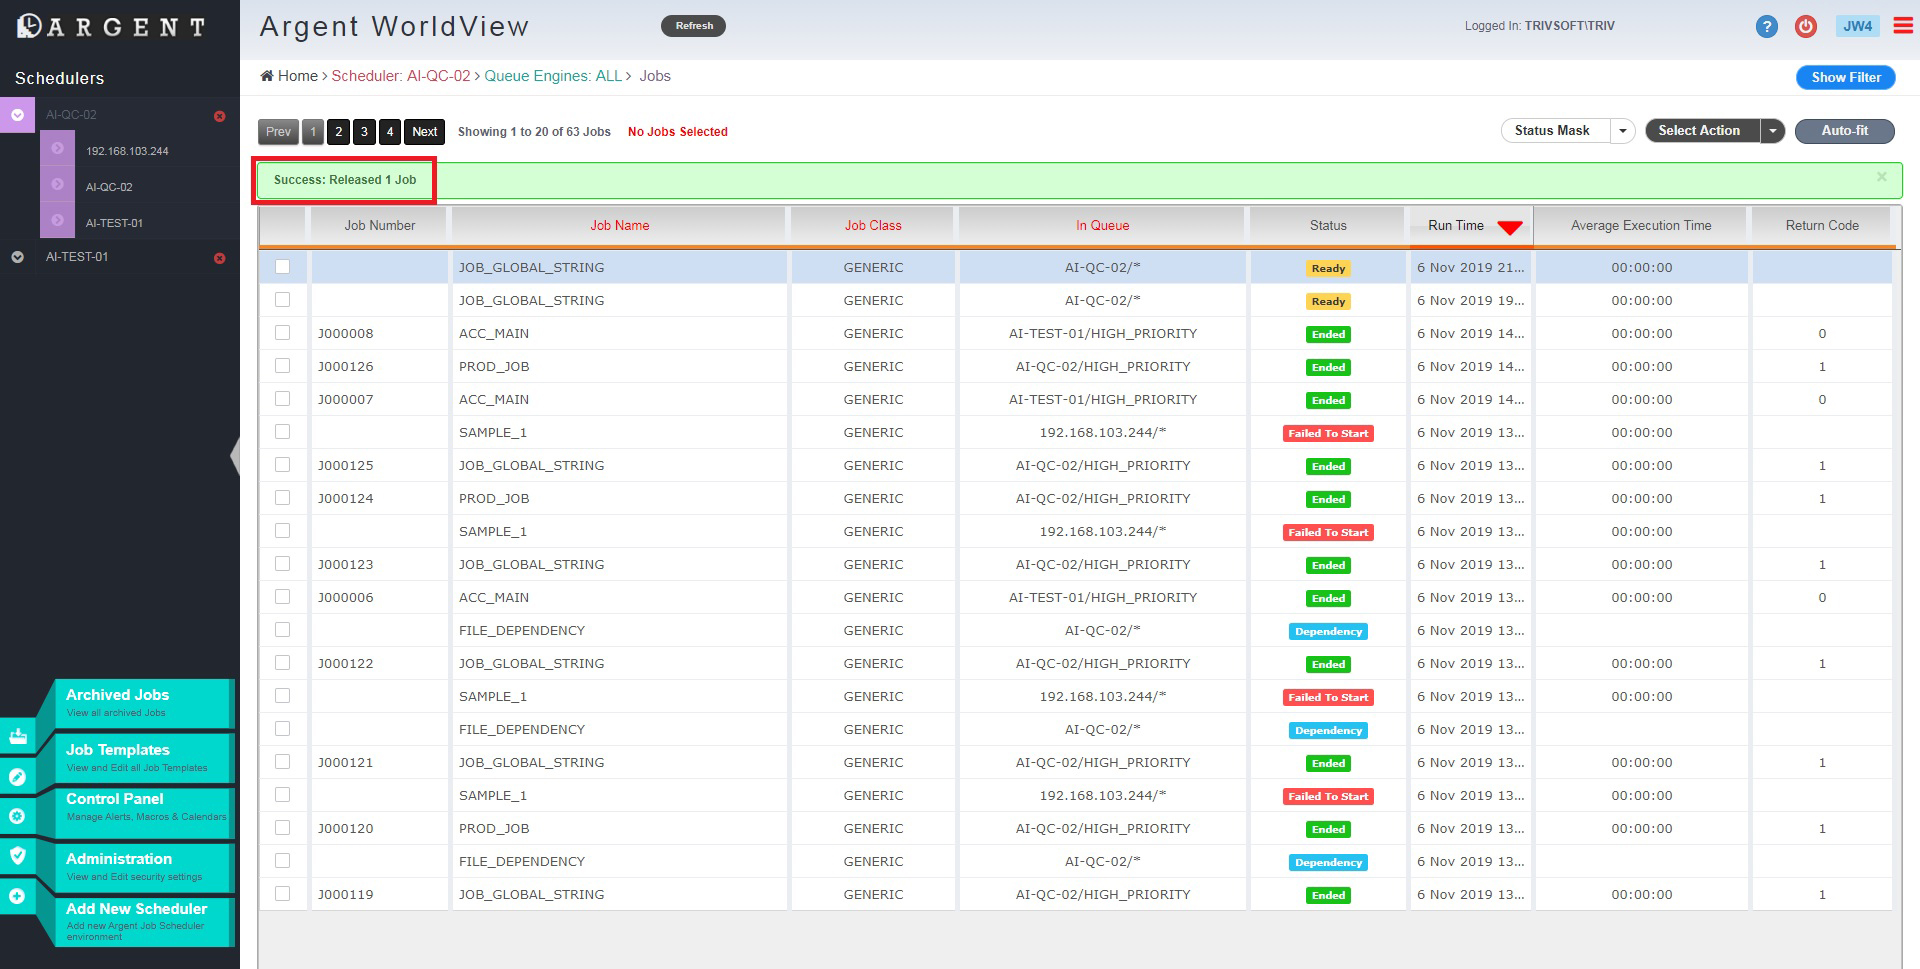
JW4 Screen – Listing Instances of a Job and Their Status
Double clicking a Job from the JW2 or JW3 screen drills down to the JW4 screen where the instances of the specified Job are displayed
Each instance of the Job is displayed along with the Job Number (if it has started the execution), the Queue in which the Job is put into, the Job status, run time, and the average execution time are listed
The JW4 screen can also be accessed directly from the JW1 screen if the option set in the View Mask filter is Instance View
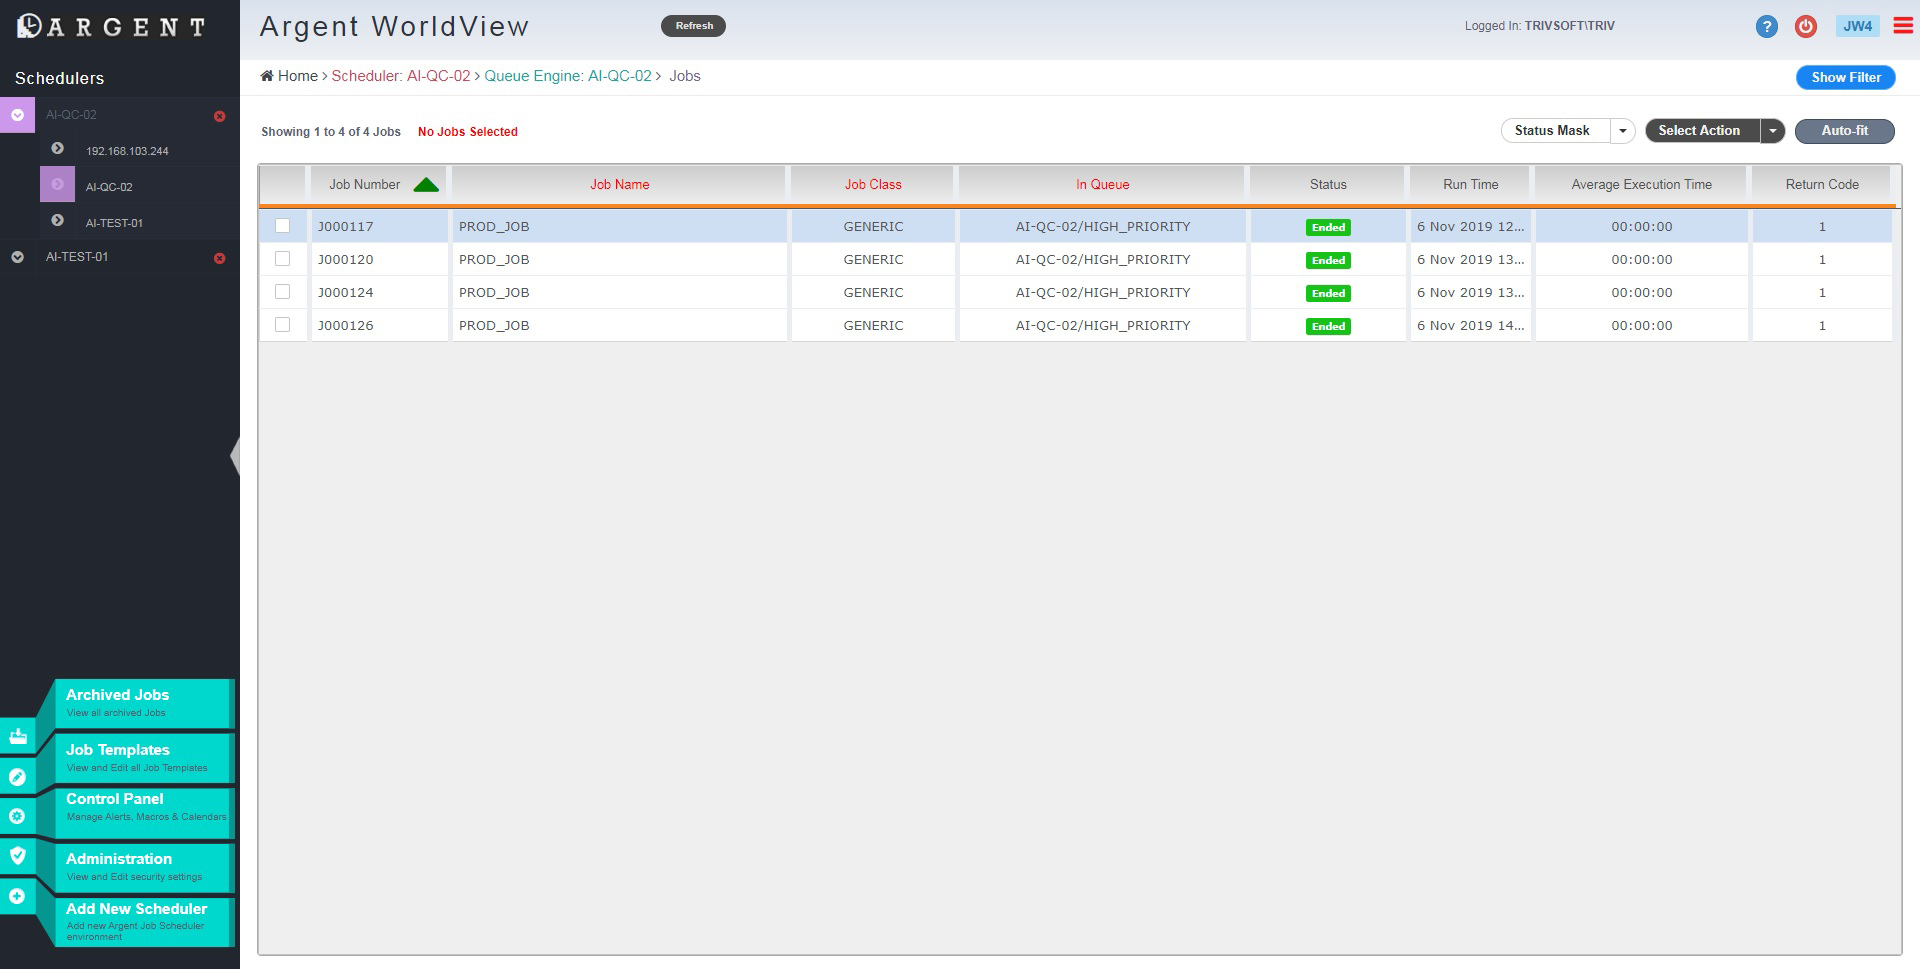
The ‘Status Mask’ combo box allows status-wise selection of Job instances in the JW4 screen
The ‘Select Action’ combo box allows doing the below actions on the selected Jobs
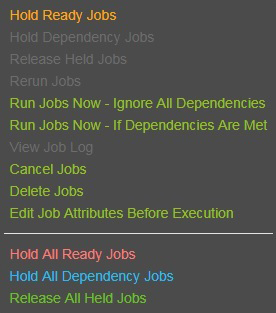
- Hold Ready Jobs
This option allows holding the selected Job instances which are in Ready state
- Hold Dependency Jobs
This option allows holding the selected Job instances which are in Dependency status
- Release Held Job
This allows returning the Held Job instances to their previous state (Ready/Dependency)
- Rerun Job
The Rerun option allows Job instances with the following statuses to be rerun: Aborted, Ended, Failed, Abended, Cancelled, Failed To Start, or Suspend
- Run Job Now – Ignore All Dependencies
This option allows the selected Dependency status Job instances in the Ready or Held status to execute by ignoring the Dependency
- Run Job Now – If Dependencies Are Met
This option allows the selected Dependency status Job instances in the Ready or Held status to execute if the Dependency is met
- View Job Log
This option displays the log of the executed Jobs
- Cancel Job
This option cancels the selected Job instances in the Ready, Held, Running, Pending, or Processing states
- Delete Job
This option is to delete the selected Job instances with status Ready, Held, Aborted, Completed, GUI Editing, Failed, Abended, Cancelled, Failed To Start, Suspend, or Submitting
- Edit Job Attributes Before Execution
This option allows editing the Job attributes associated with the selected Job instance before it is executed
- Hold All Ready Jobs
This option allows holding all Jobs which are in Ready status
- Hold All Dependency Jobs
This option allows holding all Jobs which are in Dependency status
- Release All Held Jobs
This option allows releasing all Jobs in Held status to their corresponding Ready or Dependency status
The below three options are applicable to ALL Job instances of the selected category
The result of the action will be displayed as a message after performing any action from the ‘Select Action’ combo box
Archived Jobs (JW5) – Scheduling Engine-Wise Listing of Archived Jobs
Archived Jobs can be viewed using the ‘Archived Jobs’ button on the left pane of the screen

The screen lists all the previously Archived Jobs for the selected Scheduling Engine

The Scheduling Engine whose Archived Jobs are to be displayed can be selected from the combo box provided
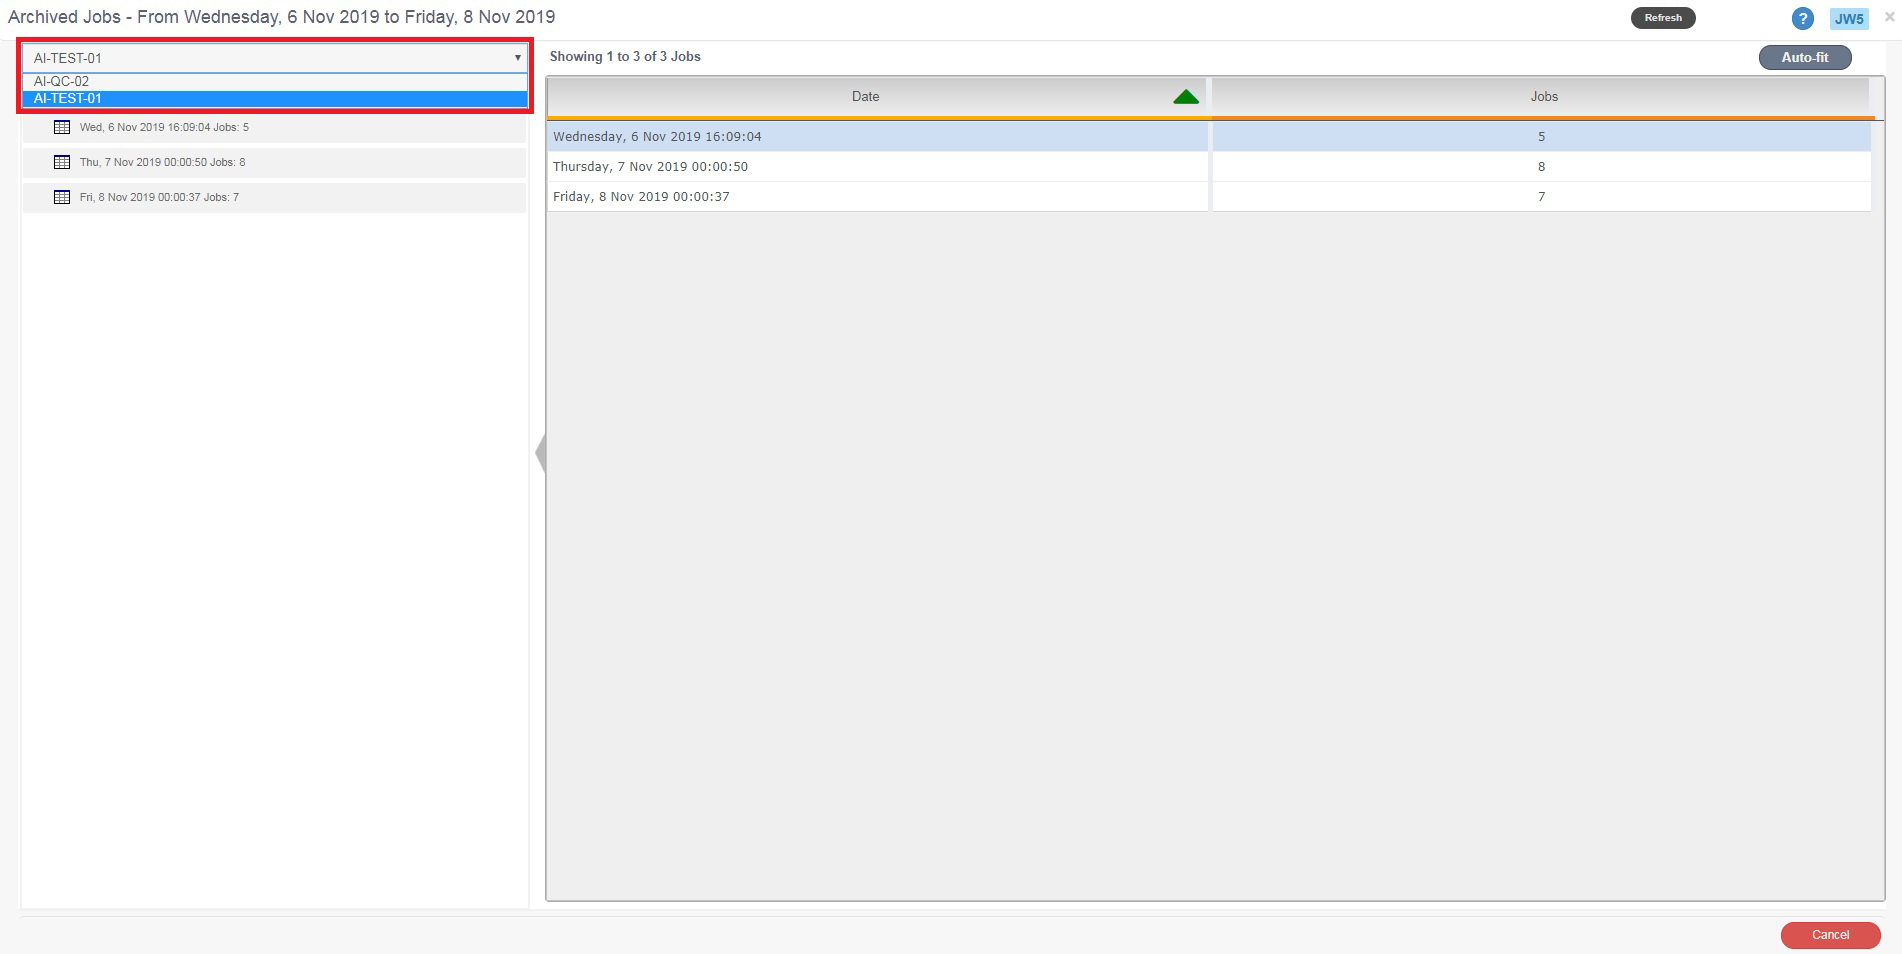
On selecting an entry from the left tree, the Archived Jobs for the selected entry are shown in the right pane
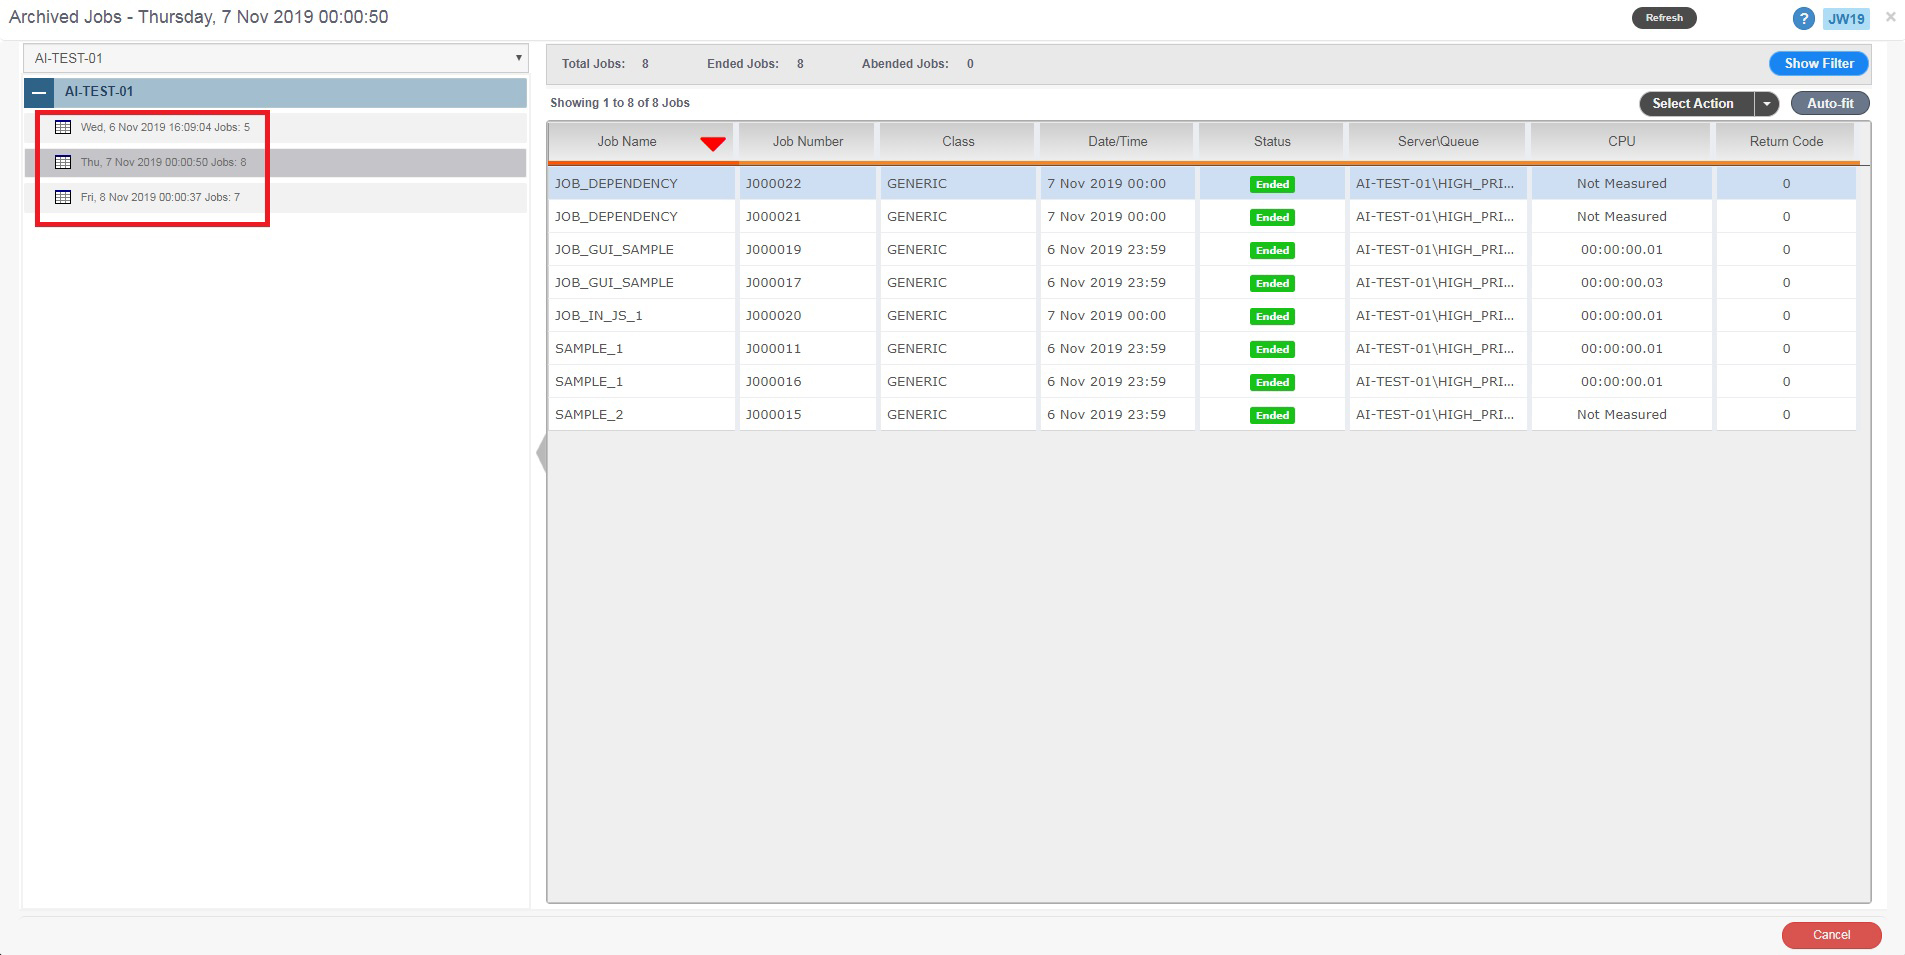
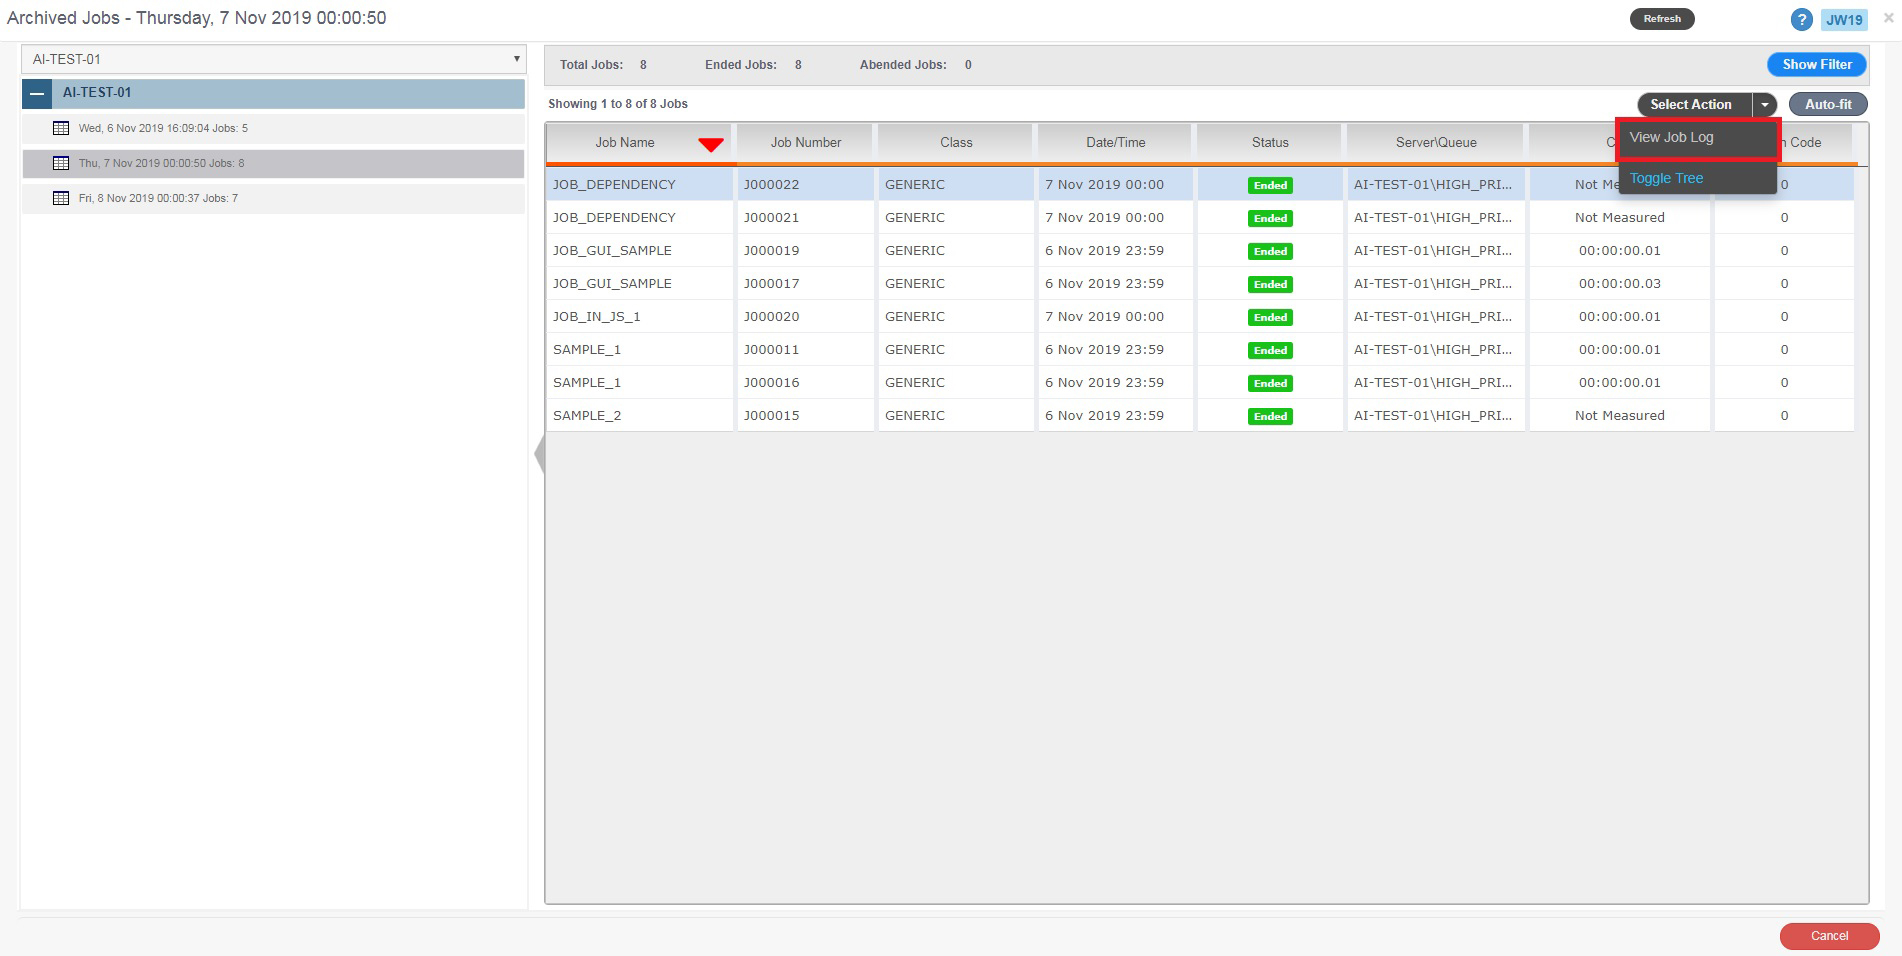
Select ‘View Job Log’ from the option ‘Select Action’ on the right pane to get the Log file of a Job
Job Templates (JW14) – Create or Customize Job Templates
Job Templates can be created or customized using the ‘Job Templates’ option in the main screen

The Scheduling Engine whose Job Templates are to be displayed can be selected from the combo box provided

Selecting the tree Node ‘Job Templates’ will list the OS types in the right pane which are already included in the Scheduling Engine
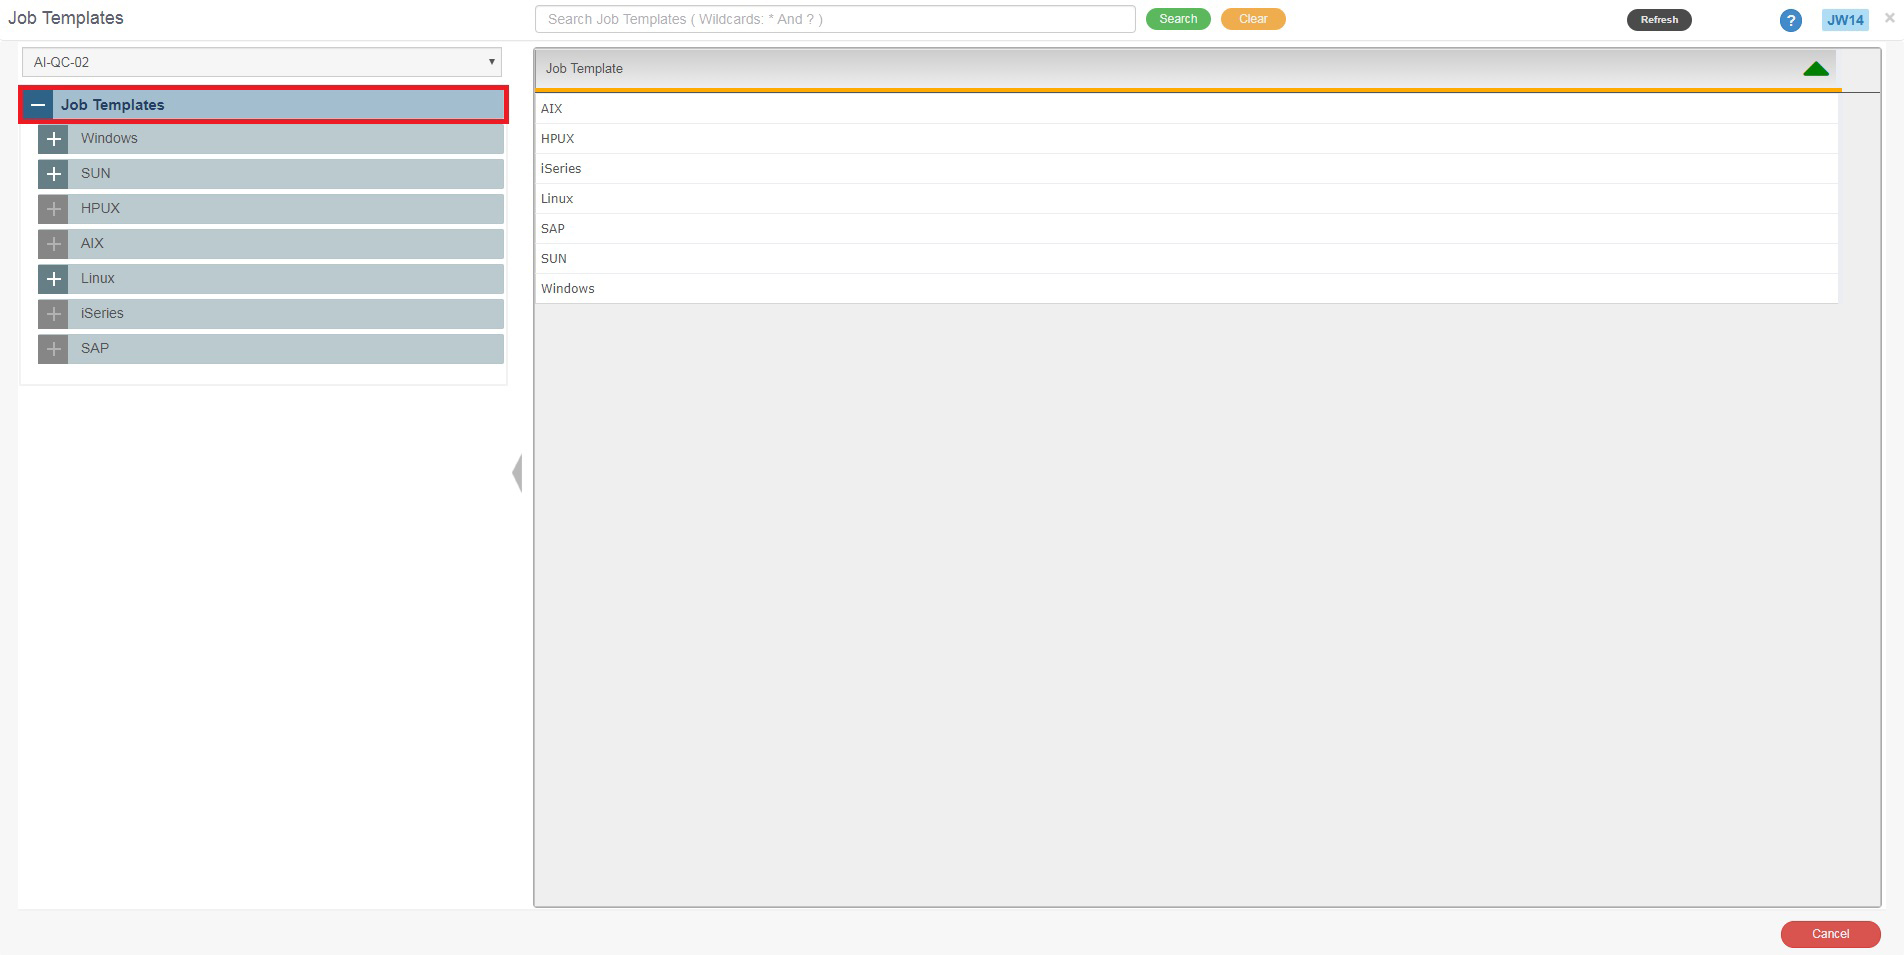
Selecting an OS Node in the tree will display the Job Classes which are created under that particular OS type of the selected Scheduling Engine

Options are included in the ‘Select Action’ combo box to create, delete, or copy a Job Class
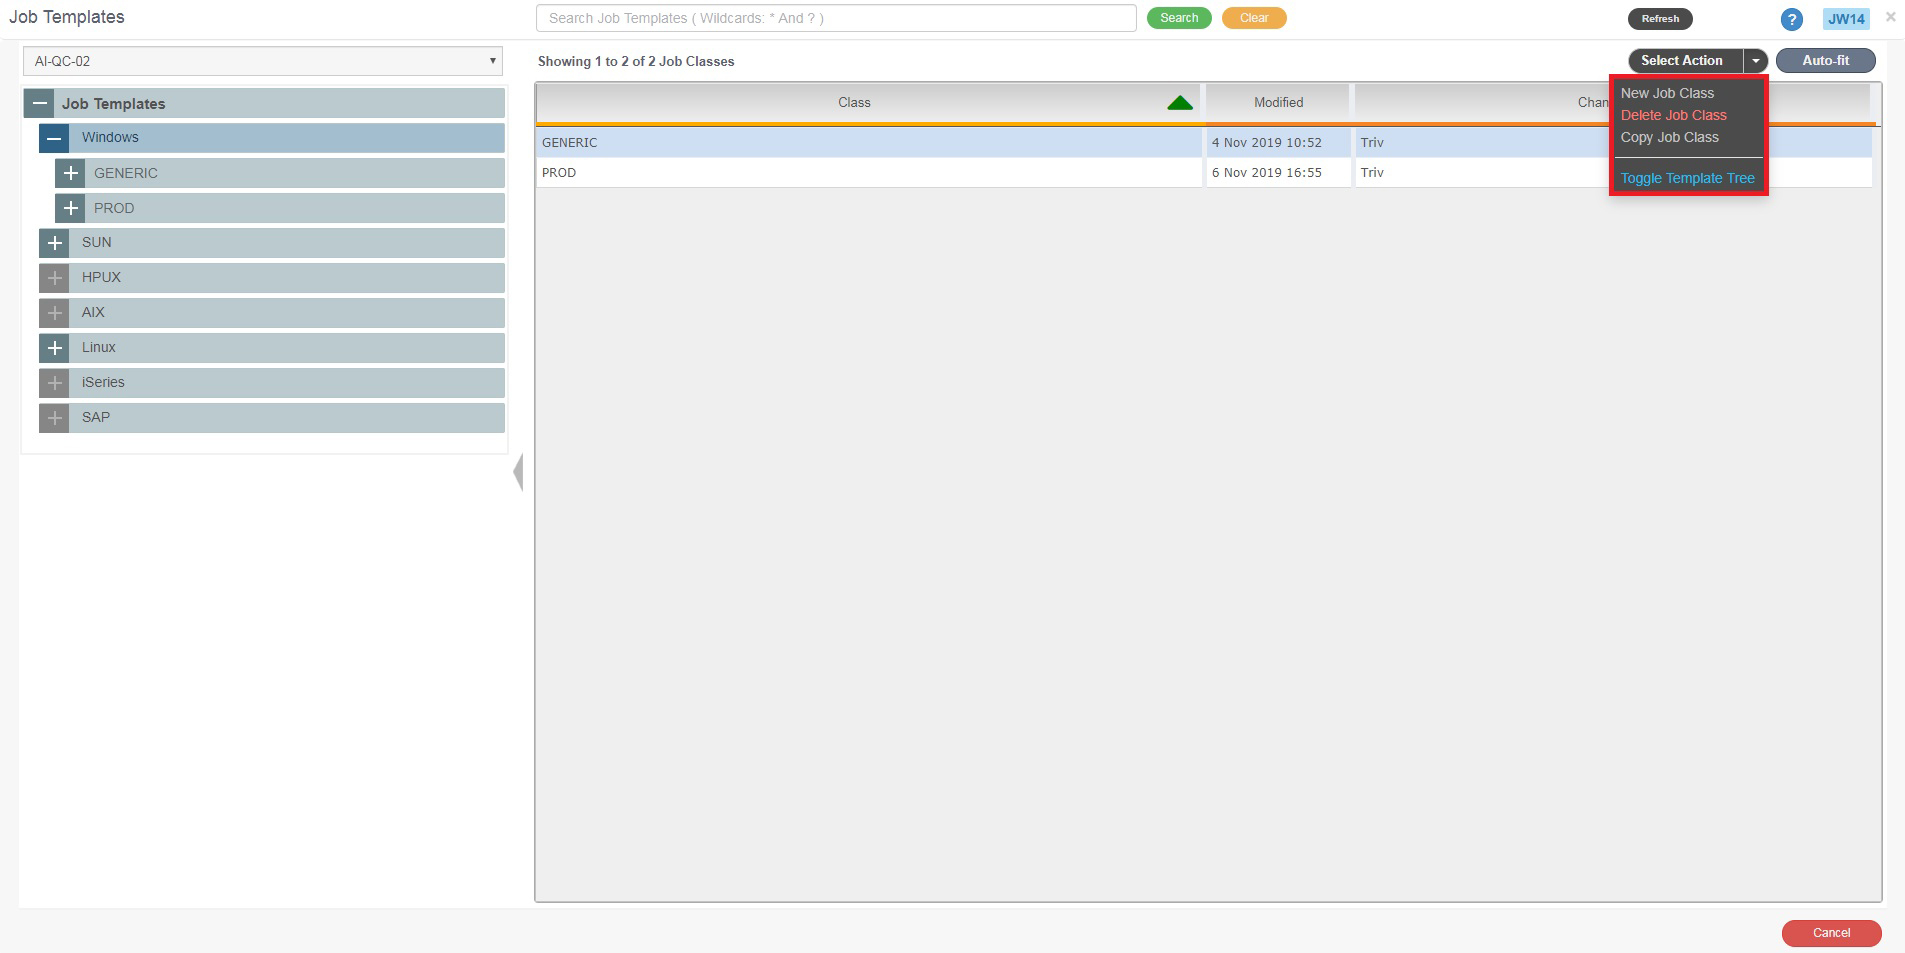
Selecting a Job Class Node will list all the Job Templates created under that particular Job Class

On selecting a Job Class node, the ‘Select Action’ combo box will provide options to create or delete a Job, rename, delete, or copy a Job Class, and edit the Job Class property
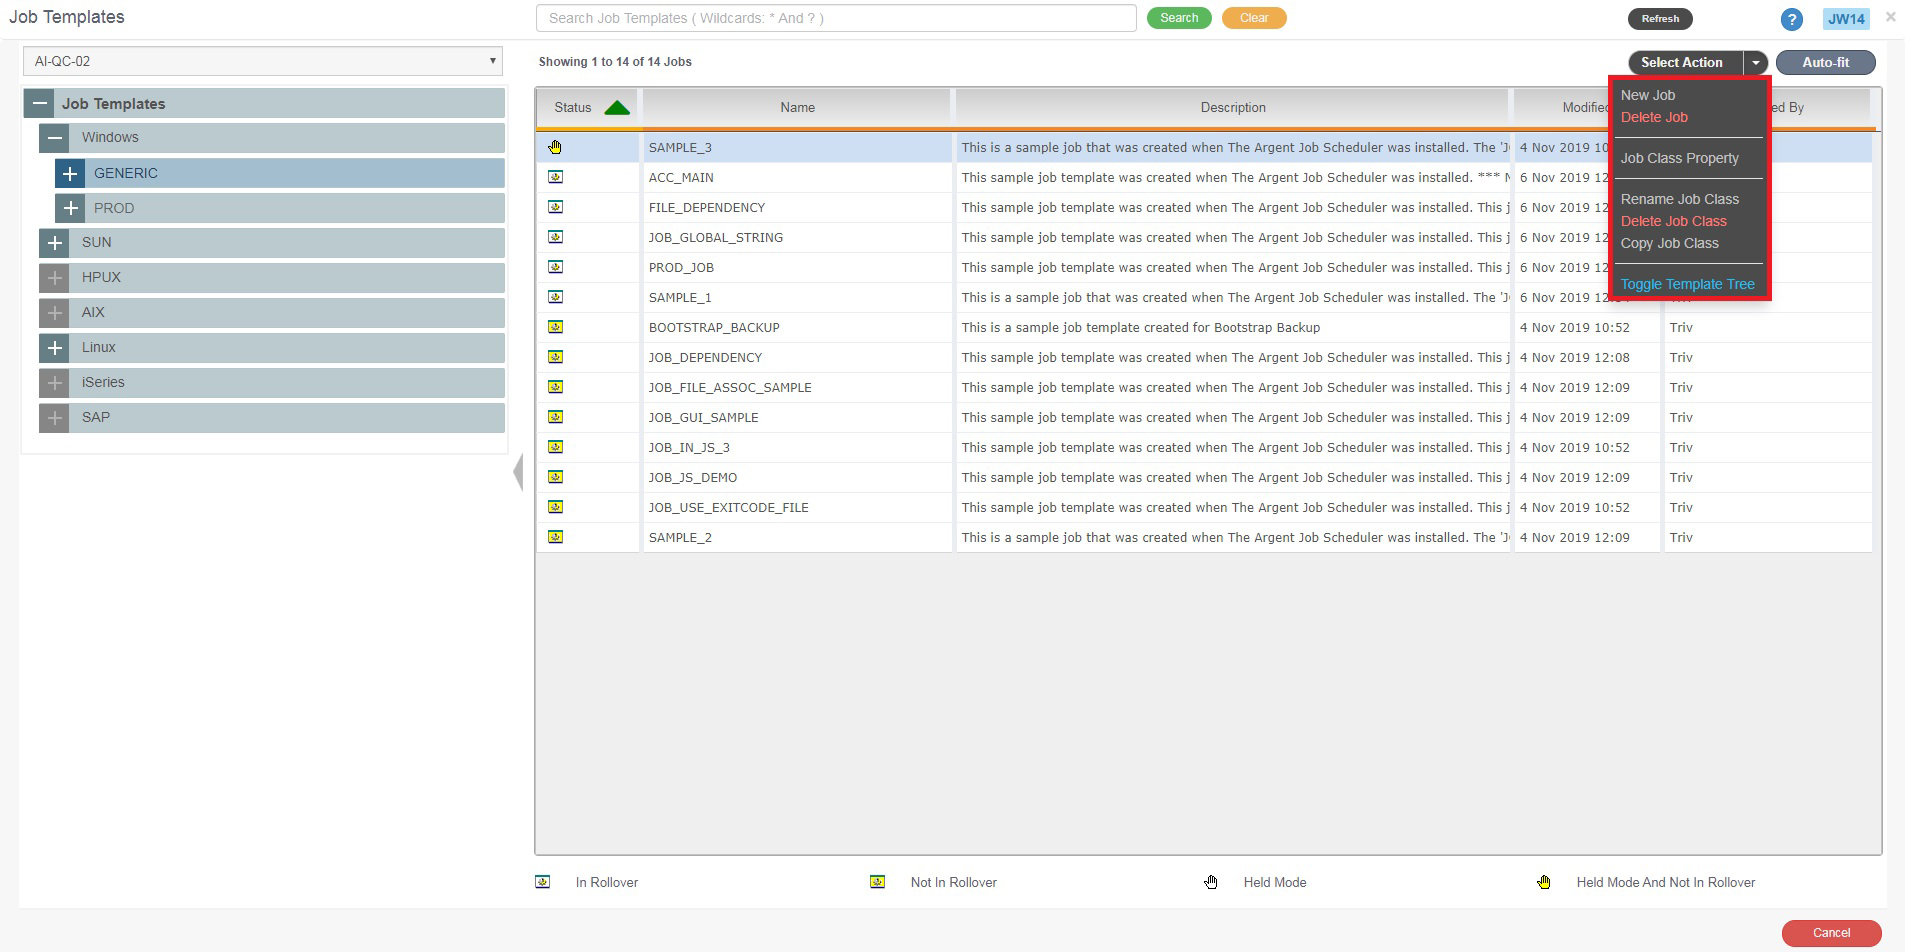
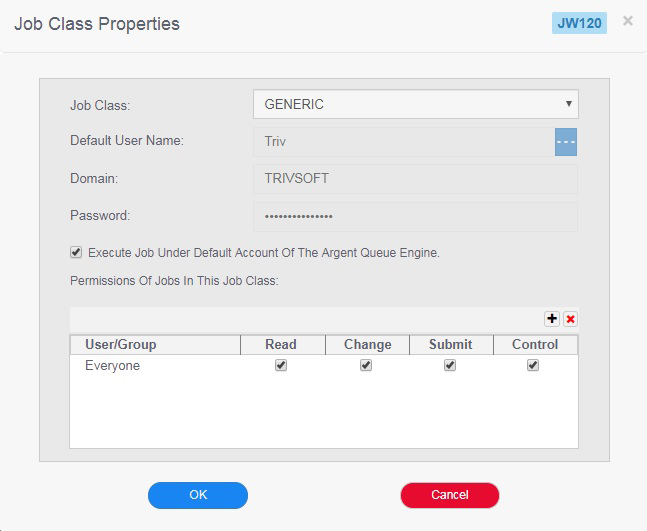
Selecting ‘Job Class property’ option from the combo box will launch a subwindow, ‘Job Class Properties’ (JW120), where the properties for the selected Job Class can be specified
Selecting a ‘Job Template’ from the tree will display the Job diagram of the selected Job Template in the right pane
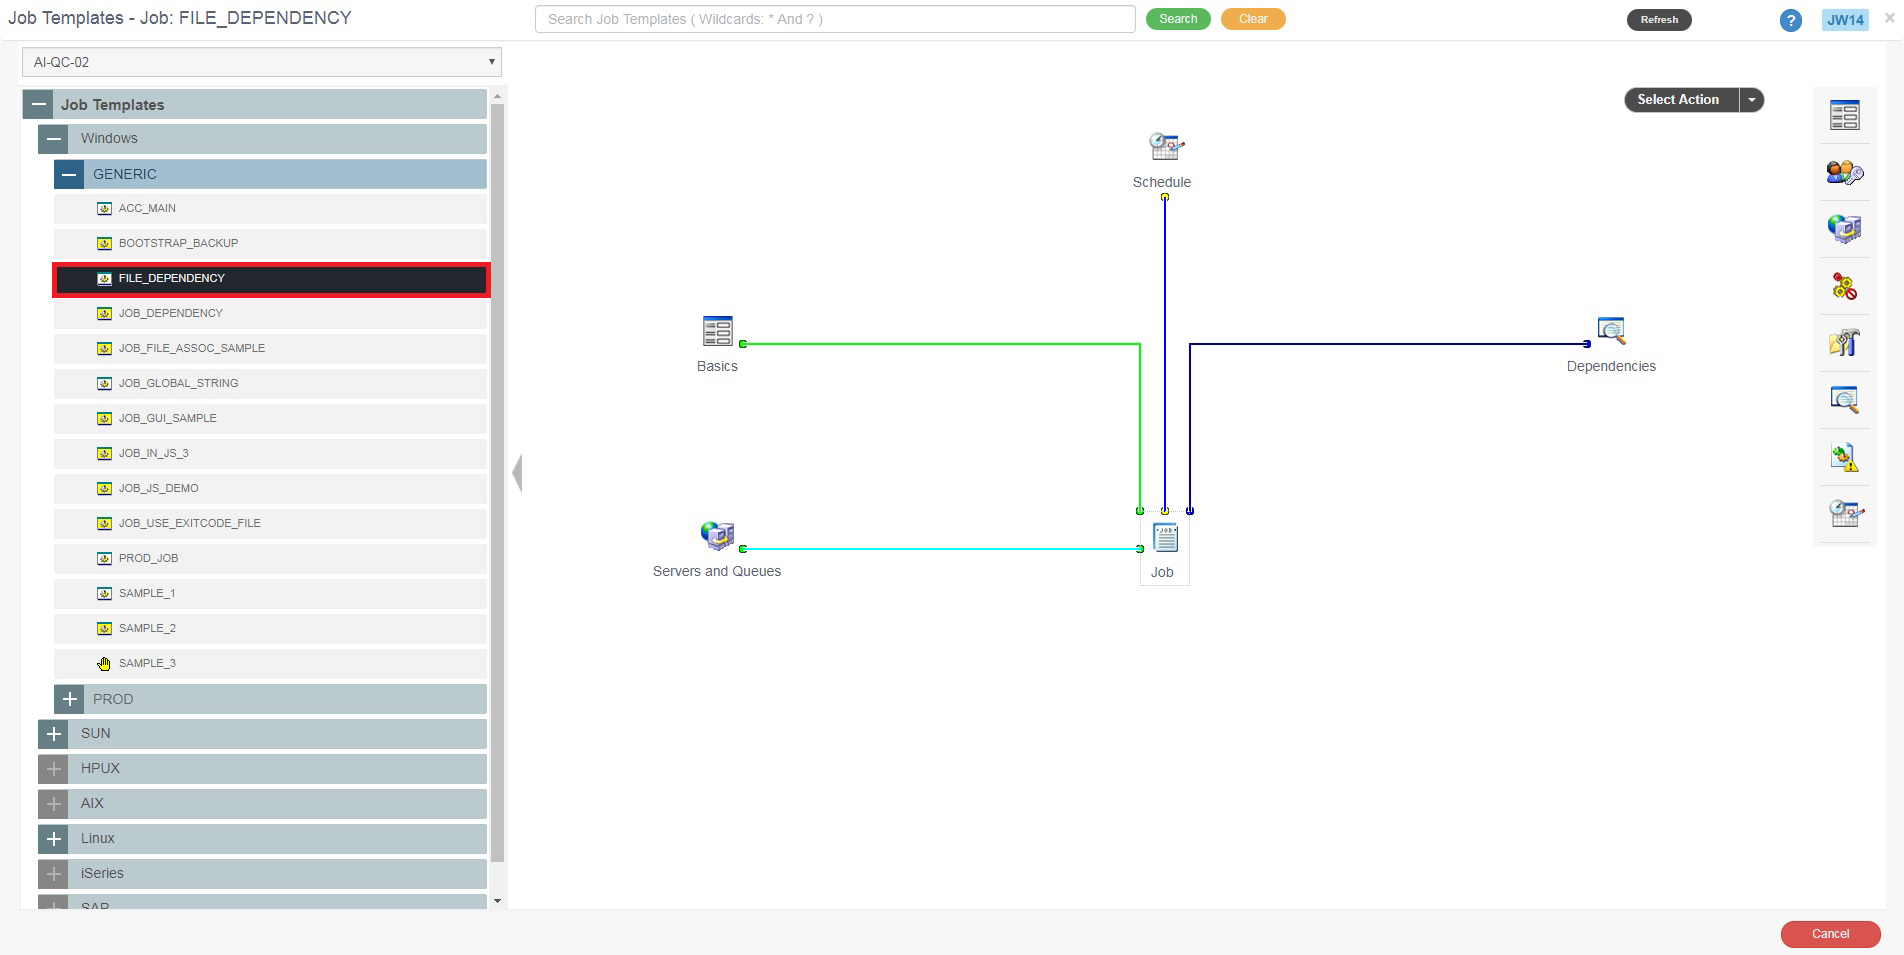
Job parameter buttons are provided in the right pane in order to customize the Job Template
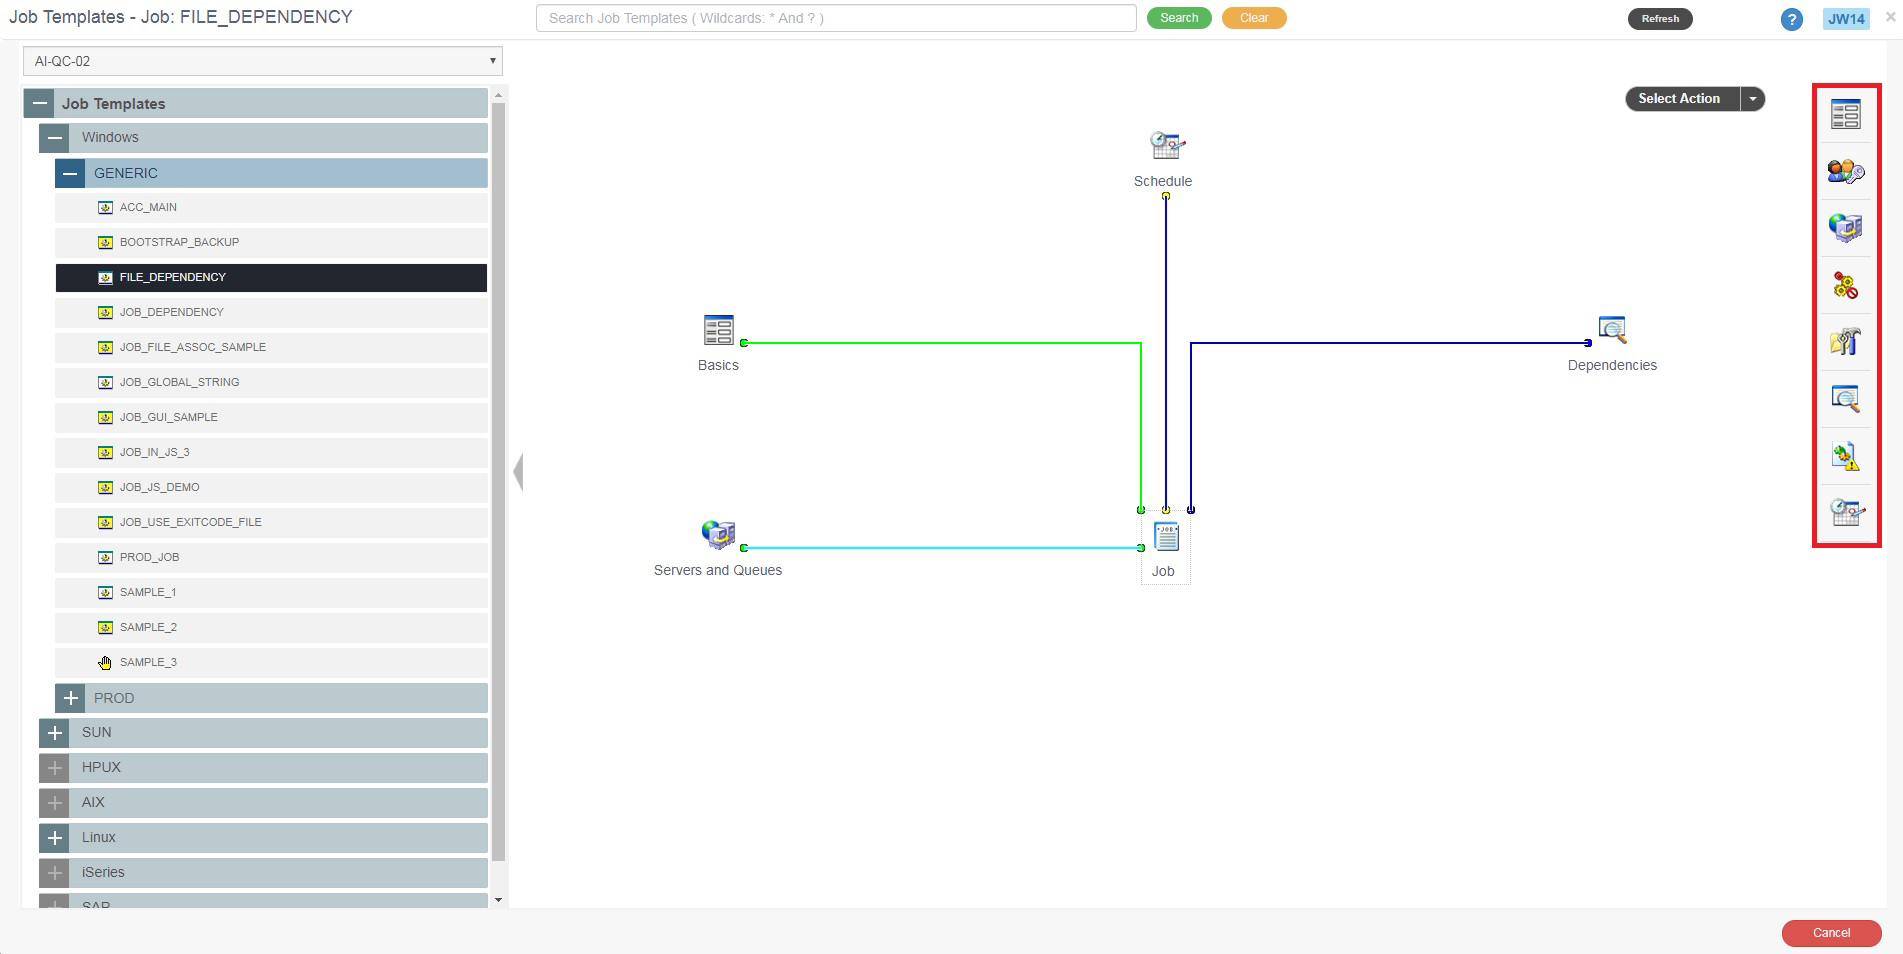
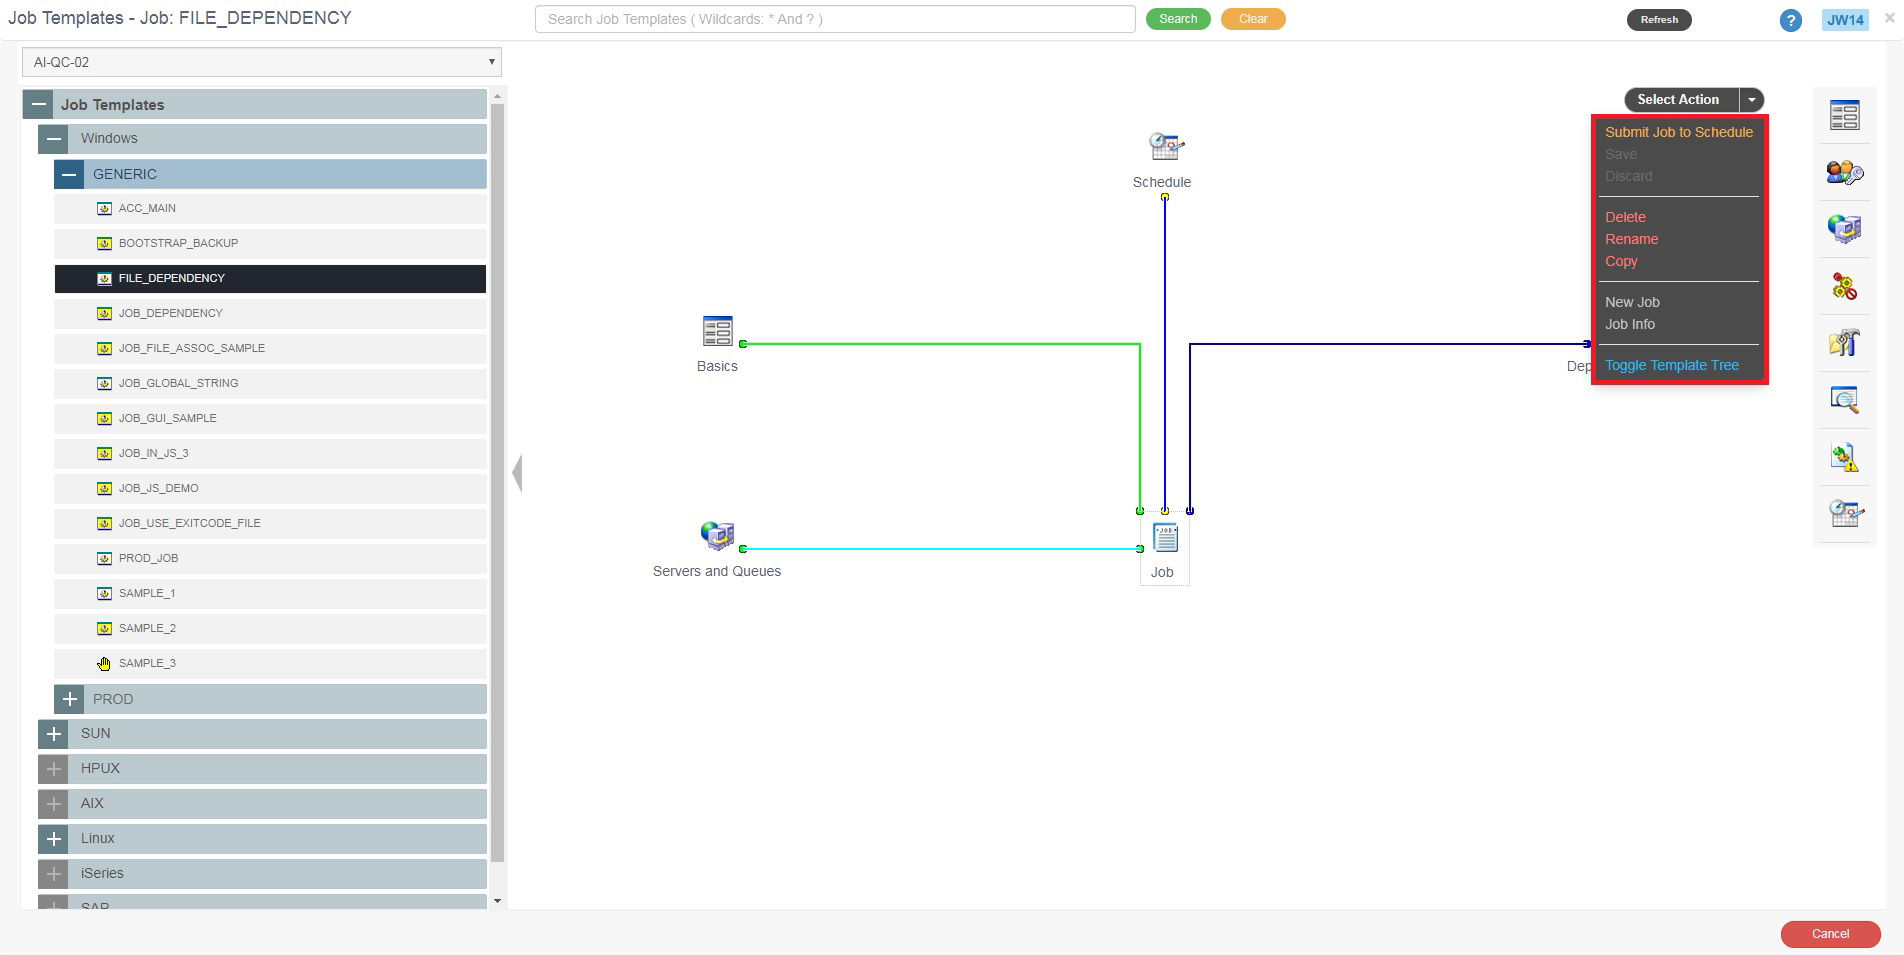
On selecting a Job Template from the tree, the combo box ‘Select Action’ will provide options to create, delete, rename, and copy a Job
It also provides the option to submit a Job to the Scheduler
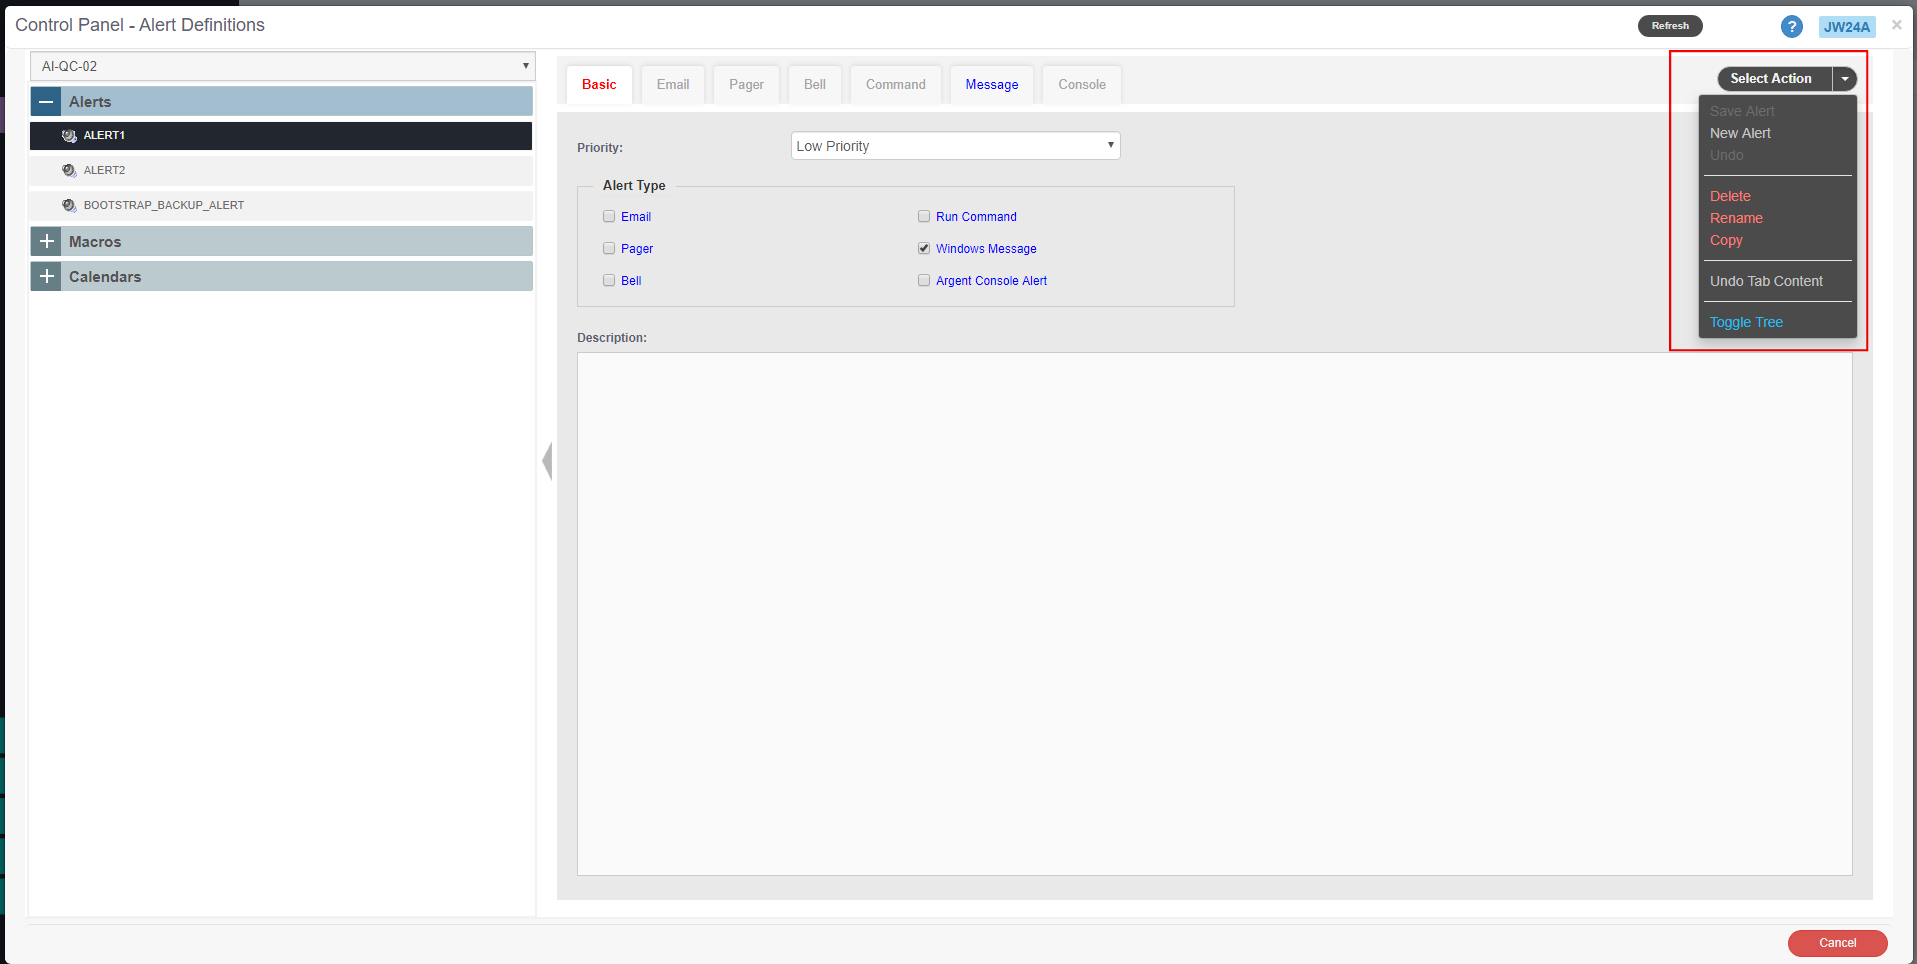
Control Panel (JW24) – Create, Delete, or Customize Alerts, Macros, and Calendars
Alerts, Macros, and Calendars be can created, deleted, or customized using the ‘Control Panel’ option in the main screen
Selecting the tree node ‘Control Panel’ will list all of the Alerts, Macros, and Calendars which are already included in the Scheduling Engine

Options are included in the ‘Select Action’ combo box to create, delete, or copy the selected object
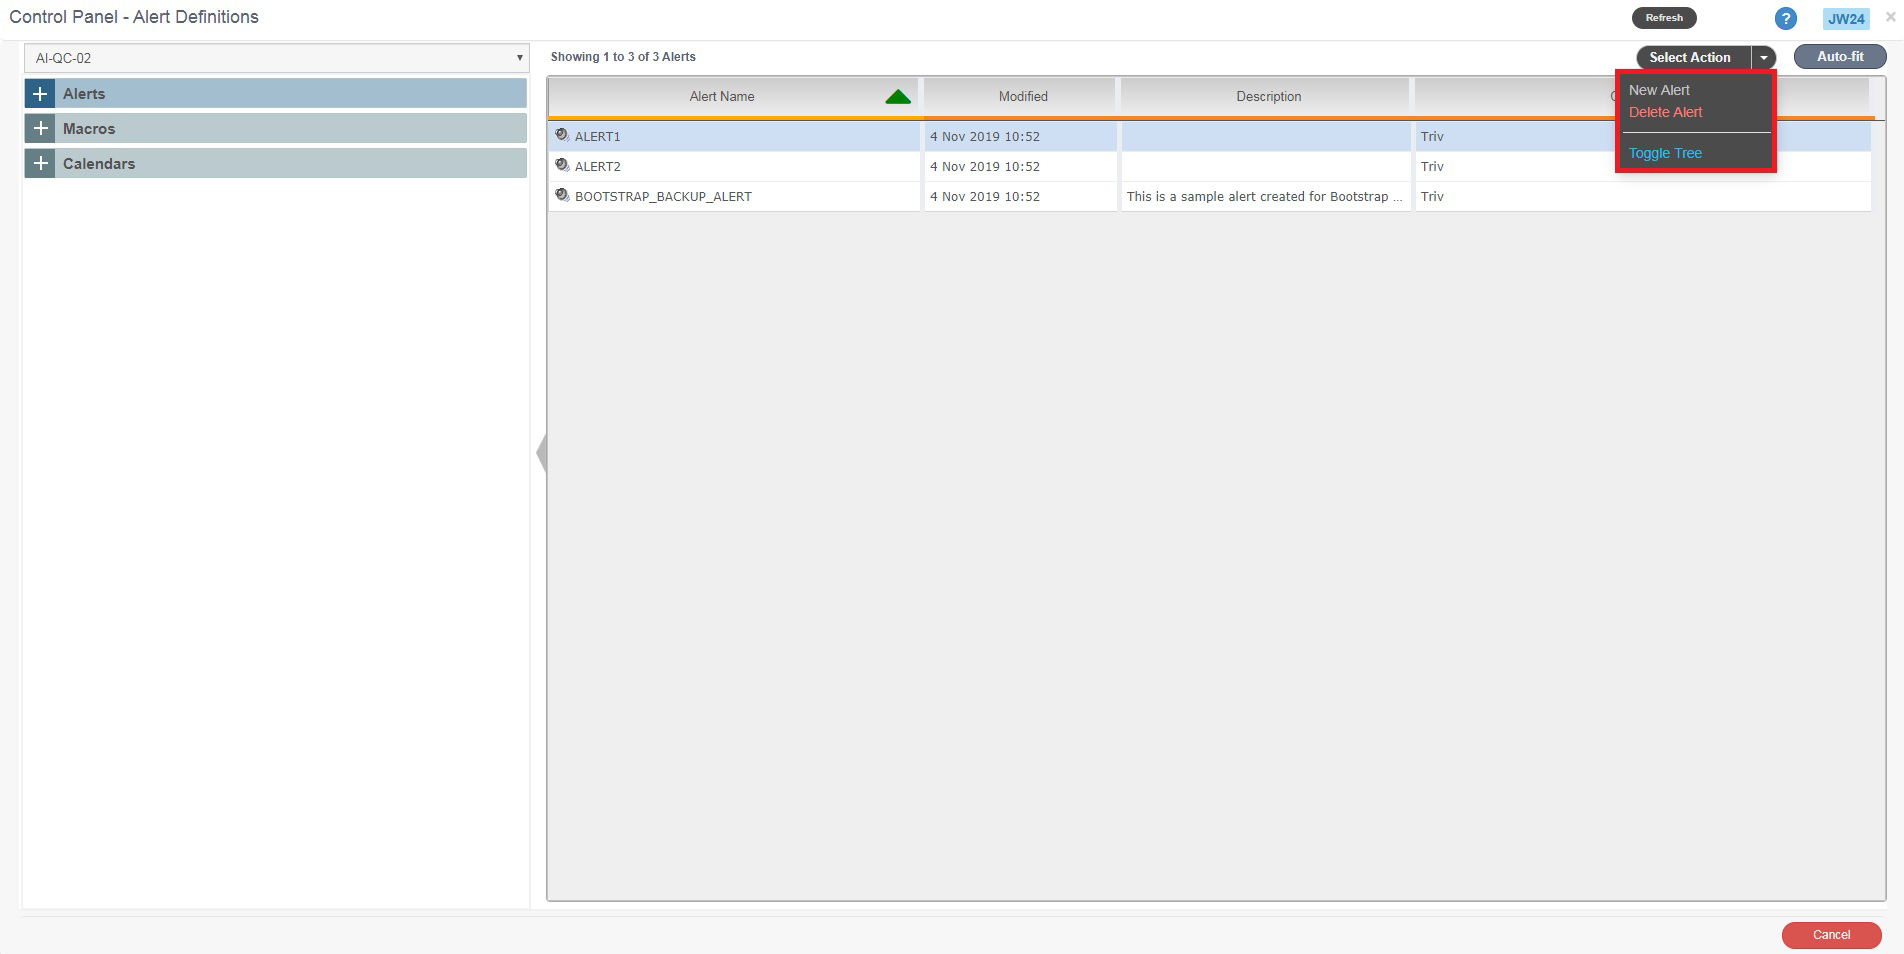
On selecting an Alert, Macro, or Calendar definition, options are included in the ‘Select Action’ combo box to create, delete, copy, or rename the selected object
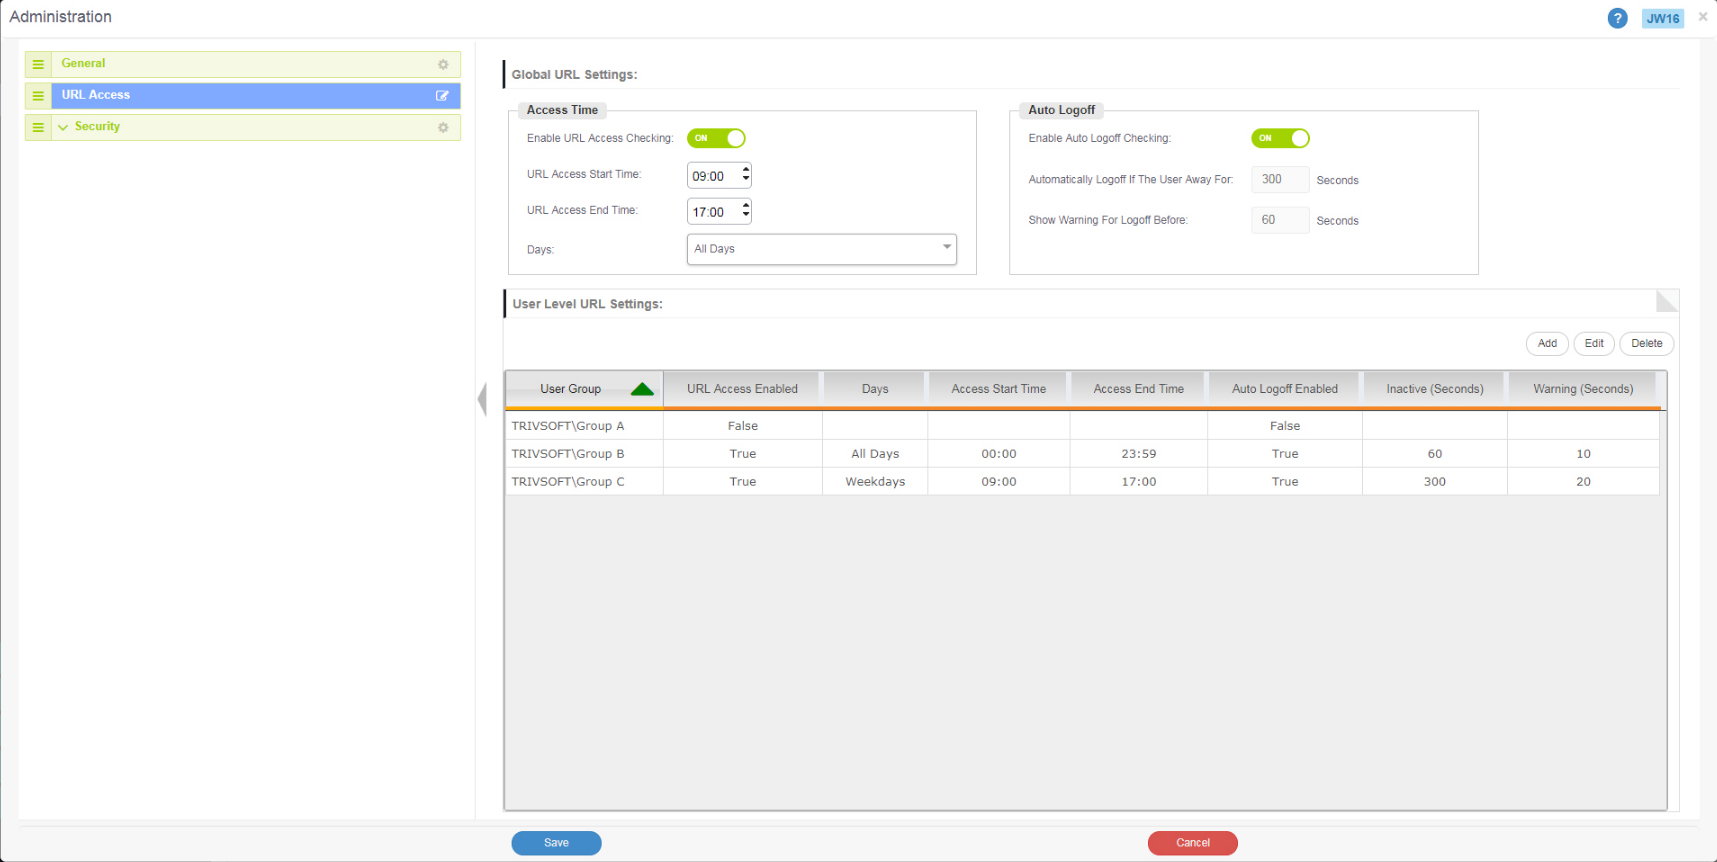
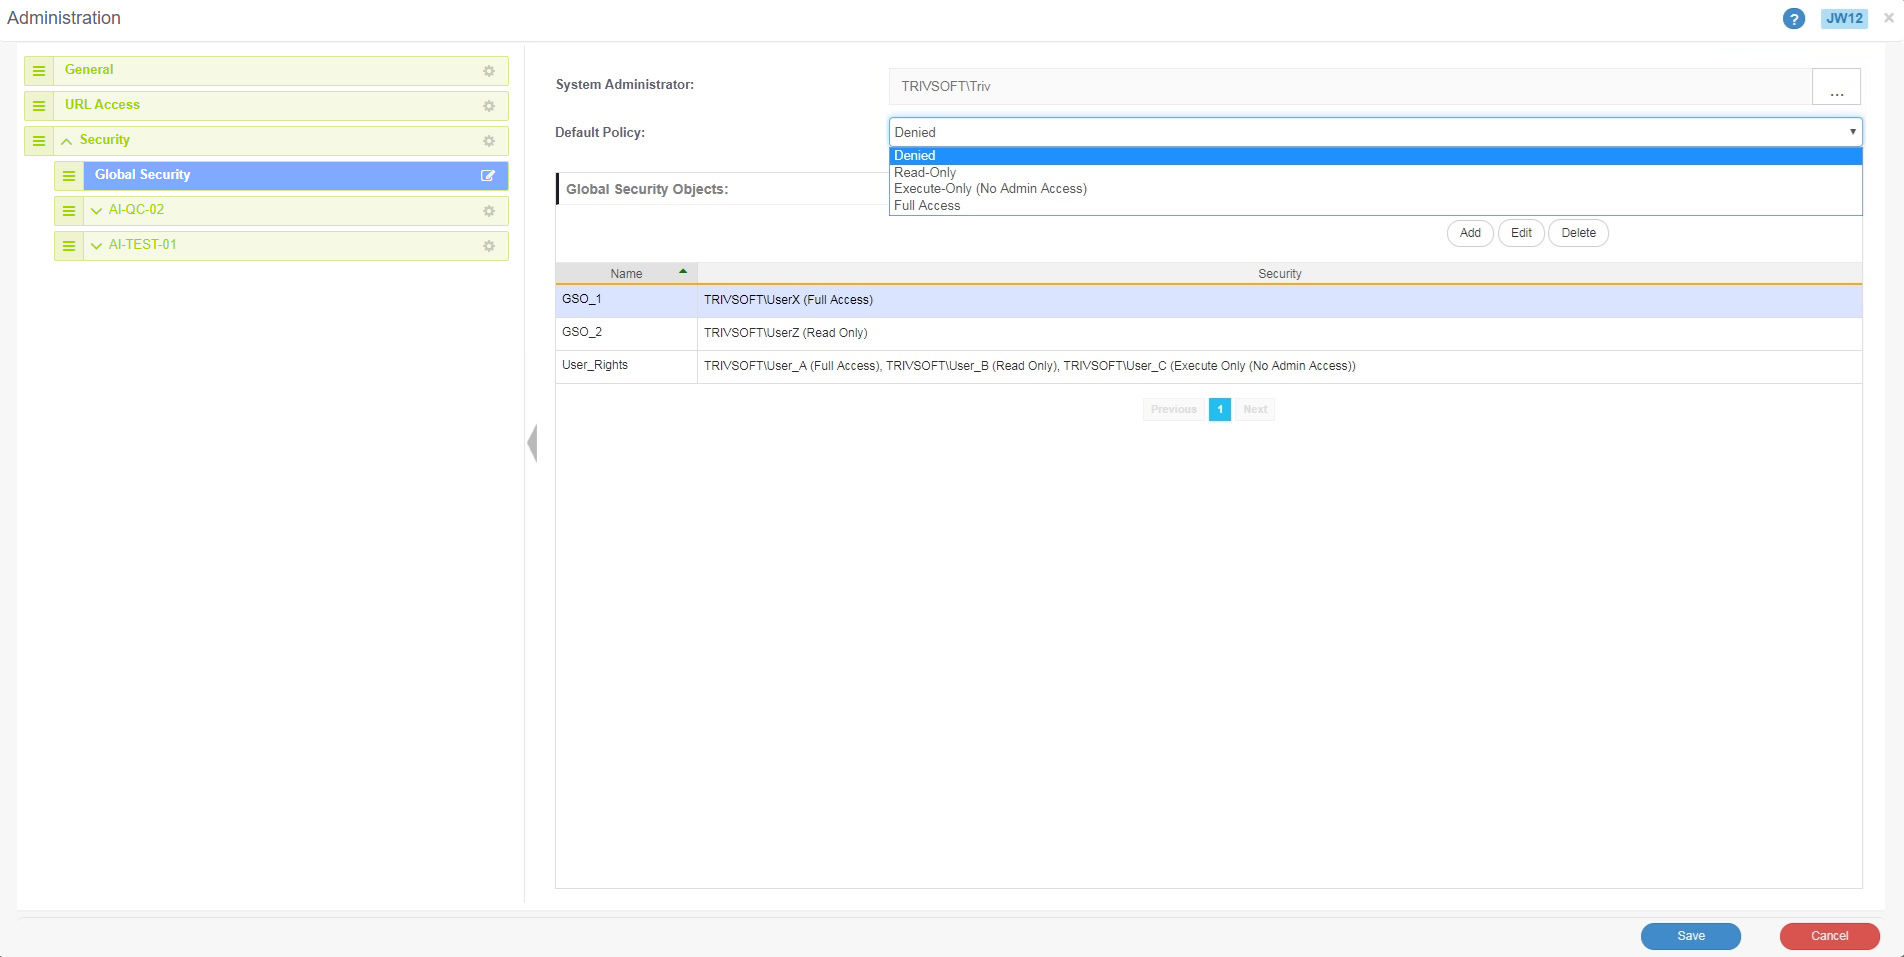
Administration (JW16) – General Settings, Global URL Settings, and Security
General Settings, Global URL Settings, and Security features can be accessed using the ‘Administration’ option in the main screen
Auto Refresh, Paging, and Theme settings come under the ‘General’ section
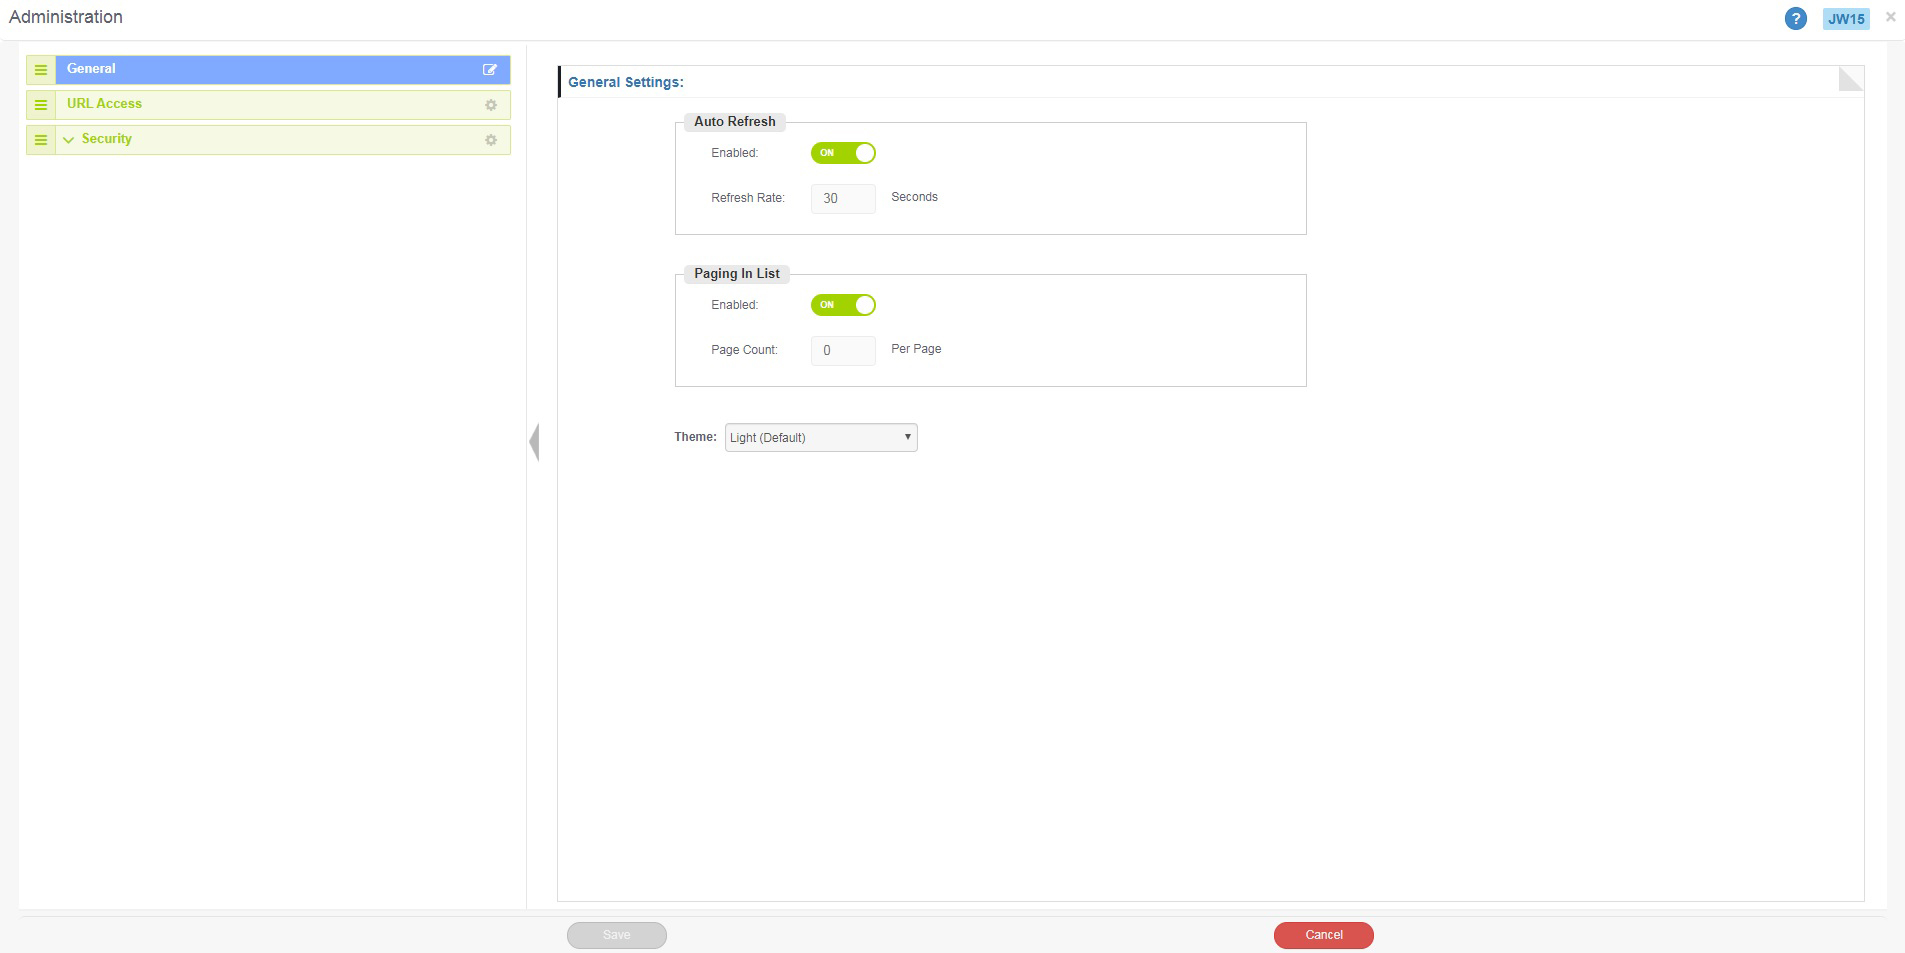
The default value for Auto Refresh time is 30 seconds
This can be edited to meet the customer’s requirement
The default value for Paging In List is ‘Auto’, which means an automatic setting of 1,000 rows will be applied if the list has more than 1,000 entries
This can be edited to a value below 1,000 to meet the customer’s need
The Theme combo box allows setting different themes to affect how the Argent WorldView Website displays
‘URL Access’ section includes Global URL Settings and User Level URL Settings
For more details on URL settings, please refer the following KBI article:
https://help.argent.com/#KBI_311768
Argent WorldView’s security features allow setting different levels of access privileges for users and groups on Scheduling Engines and Queue Engines
This feature provides the option to select which users can view which Scheduling Engines or Queue Engines
Argent WorldView’s security mechanism integrates with Active Directory for authentication
For more details on security settings, please refer the following KBI article:
https://help.argent.com/#KBI_311123
Resolution
N/A