KBI 310131 Web Service Extension Within IIS Manager
Version
Argent Web Products – All
Date
17 Nov 2008
Summary
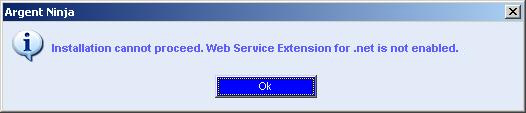
When installing any Argent Web Product, you might receive an error concerning Web Service Extension for .net not being enabled.
Technical Background
Before you decide to install a particular version of ASP.NET, it is a good idea to first verify which version or versions are currently enabled and allowed in the Web Service Extensions, in IIS.
ASP.NET is not enabled on Windows Server 2003 by default.
However, if you selected the ASP.NET check-box when enabling IIS, ASP.NET 1.1 should appear in the Web Service Extensions list in IIS.
If you installed Microsoft SQL Server 2005 on the same computer as IIS, then ASP.NET 2.0 may also appear in the Web Service Extensions list.
After IIS is installed, you can use the following procedure to verify which version or versions of ASP.NET are currently enabled and allowed as a Web Service Extension in IIS.
Verify The Currently Enabled And Allowed Versions Of ASP.NET
-
On each front-end Web server, click Start, point to Administrative Tools, and then click Internet Information Services (IIS) Manager.
-
In the left-hand pane, click the plus sign (+) next to the local computer and then click the Web Service Extensions node.
All versions of ASP.NET that are currently enabled appear in the Web Service Extension column.
-
The Status column displays whether the version or versions of ASP.NET (that are currently enabled) are allowed or disallowed as a Web Service Extension in IIS.
You can change this status by right-clicking the version of ASP.NET you want to change and then click either Prohibit or Allow.
Resolution
If the version of ASP.NET that you want to use does not appear in the Web Service Extensions list, you can install and enable it by using the procedures listed below.
Installing ASP.NET 2.0 On Windows Server 2003
Windows Server 2003, prior to R2 includes ASP.NET 1.1.
If you selected the ASP.NET check-box when enabling IIS, ASP.NET 1.1 is enabled as the default Web Service Extension.
ASP.NET 2.0 is not included with Windows Server 2003.
Use the following procedures to install ASP.NET 2.0 and verify that it is allowed in the Web Service Extensions.
Download and install the .NET Framework Version 2.0 Redistributable Package from the Microsoft Download Center on each front-end Web server.
After successfully installing ASP.NET 2.0 on Windows Server 2003, the next step is to enable ASP.NET 2.0 as a Web Service Extension in IIS.
Enable ASP.NET 2.0 In The Web Service Extensions
This procedure enables ASP.NET 2.0 in the Web Service Extensions without changing the configuration of the virtual servers.
You will specify which virtual servers you want to use ASP.NET 2.0 in later procedures.
-
Click Start, and then click Run.
-
In the Open box, type cmd and then click OK.
-
Open the following directory:
%drive%\WINDOWS\Microsoft.NET\Framework\v2.0.nnnnn
where %drive% is the drive letter on which you installed Windows Server 2003 and nnnnn is the least significant version number of ASP.NET 2.0.
-
Run the following command at the command prompt:
aspnet_regiis.exe -iru -enable
-
Close the command prompt.
-
In Internet Information Services (IIS) Manager click Refresh from the Action menu.
-
Verify that ASP.NET v2.0.nnnnn is listed in the Web Service Extension column and that the status is Allowed.
If the status is Prohibited, you can change the status by right-clicking ASP.NET v2.0.nnnnn and then clicking Allow.
-
After verifying that ASP.NET is allowed, the next step is to specify which virtual servers you want to use ASP.NET 2.0. Proceed to specifying which virtual servers use ASP.NET 2.0.
On 32-bit versions of Windows Server 2003 or Windows Server 2003 R2, you can specify which virtual servers will use ASP.NET 2.0 by using either Internet Information Services (IIS) Manager or the command line option.
On x64-based editions of Windows Server 2003 or Windows Server 2003 R2, however, you can only use the command line option.
This is because the ASP.NET tab does not appear on the Web Site Properties pages on x64-based editions.
Specify ASP.NET 2.0 For All Virtual Servers From The Command Line
Note that after running this procedure, any new virtual servers that are created will use ASP.NET 2.0, by default.
-
Click Start, and then click Run.
-
In the Open box, type cmd and then click OK.
-
Open the following directory:
%drive%\WINNT\Microsoft.NET\Framework\v2.0.nnnnn
where %drive% is the drive letter on which you installed Windows Server 2003 and nnnnn is the least significant version number of ASP.NET 2.0.
-
To enable ASP.NET 2.0 in the IIS Web Service Extensions and use ASP.NET 2.0 with all virtual servers, run the following command:
Aspnet_regiis.exe -i -enable
Specifying ASP.NET 2.0 For Specific Virtual Servers
-
Click Start, and then click Run.
-
In the Open box, type cmd and then click OK.
-
Open the following directory:
%drive%\WINNT\Microsoft.NET\Framework\v2.0.nnnnn
where %drive% is the drive letter on which you installed Windows Server 2003 and nnnnn is the least significant version number of ASP.NET 2.0.
-
To enable ASP.NET 2.0 in the IIS Web Service Extensions and use ASP.NET 2.0 with a specific virtual server, run the following command:
aspnet_regiis.exe -s /w3svc/<identifier>/root
Where <identifier> is the IIS virtual server ID.
You can find the identifier for all virtual servers by opening Internet Information Server Manager (IIS) and clicking on the Web Sites node.
The Identifier for each virtual server is listed in the right-hand pane.
-
Repeat step 4 for each virtual server on which to use ASP.NET 2.0.
-
Type iisreset, and then press Enter.
-
After IIS is successfully restarted, type exit and then press Enter, to exit the Command Prompt.
Specify A Virtual Server To Use ASP.NET 2.0 Using IIS Manager
On each front-end Web server, click Start, point to Administrative Tools, and then click Internet Information Services (IIS) Manager.
-
In the left-hand pane, click the plus sign (+) next to the local computer.
-
Click the plus sign (+) next to the Web Sites node.
-
Right-click the virtual server you want to configure and click Properties.
-
Click the ASP.NET tab.
*The ASP.NET tab does not appear on x64-based editions of Windows Server 2003.
*This tab also does not appear if only one version of ASP.NET is allowed in the Web Service Extensions.
-
On the ASP.NET tab, select 2.0.nnnnn from the ASP.NET version drop-down list.
Where nnnnn is the minor version number.
-
Click Apply, and then click OK.
-
Repeat steps 4 through 7 for each virtual server you want to configure.
-
Click Start, and then click Run. In the Open box, type cmd, and then click OK.
-
At the command prompt, type iisreset, and then press Enter.
-
After IIS is successfully restarted, type exit and then press Enter, to exit the Command Prompt.