Job Template Customization
You can further customize the job parameters by selecting the buttons from the toolbar located on the right side of the job diagram.
The buttons are as follows:
-
Basic
-
Security
-
Servers
-
Limits
-
Advanced
-
Dependencies
-
Post Job
-
Schedule

Basic

The Basic button defines the basic parameters of a Job Template.
(W200X Job)
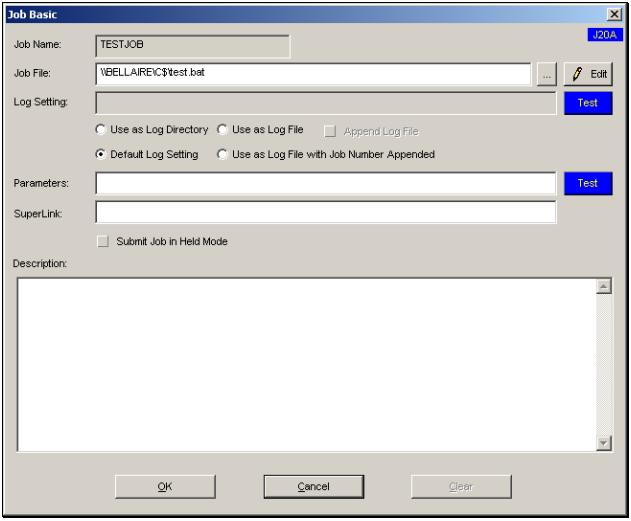
The following list shows all of the definable Job Template parameters on the basic button:
Job Name – Shows the name of the job selected. To create a new job, right-click the mouse on the Job Class leaf under which customers want to place the job
Job File – Browse the file customers wants to execute. This field cannot be left blank.
Edit – Opens Notepad.exe to edit a batch or command file.
Log Setting – This option is disabled when the Default Log Setting is selected. If any of the remaining three log options are chosen, this field is used to specify the log filename and/or path.
Default Log Setting – The job defers to the queue to assign a log directory path and filename.
Use as Log Directory – The Log Setting field specifies the directory path where the log is created; the log filename is specified by the Scheduler.
Use as Log File – The Log Setting field specifies both the directory path and the log filename. Each time the job executes, the previous log file is overwritten.
Use as Log File with Job Number Appended – The Log Setting field specifies both the directory path and the log filename. Each time the job executes, a number is added to the filename to create a new file such that the previous log file is not overwritten.
Parameters – Specify any parameters passed to the job.
Test – Tests any variables supplied in the Parameters area or Log Setting area . For example, select the JOB_GLOBAL_STRING job template (created during installation) and then click the Test button. (See https://help.argent.com/index.php?t=ajs_env_variable),
Submit Job in Held Mode – Select to submit this job in Held mode. The causes the job to appear in the current schedule, but not execute. Later you can release a held job.
Security

The Security button specifies the account credentials for the job to execute as.
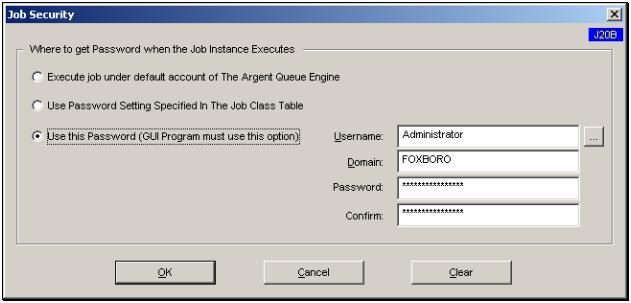
Execute job under default account of the Argent Queue Engine – This is the default password selection and uses the name, domain and password values from the queue engine’s default account.
Use password setting specified in the Job Class table – Select this option to use the username, domain and password specified in the Job Class properties. For example, from the tree in the Explorer pane, right click on the Generic job class and then select Job Class Property from the popup menu to display the class properties.
Use this Password – Select this option in order to choose a username, domain and password for this job template to execute as. This options is required for jobs that run interactively on the desktop of the specified account.
Servers

The Job Servers Group shows the available server (or servers) where the job can execute. If multiple servers are listed, the Affinity options are:
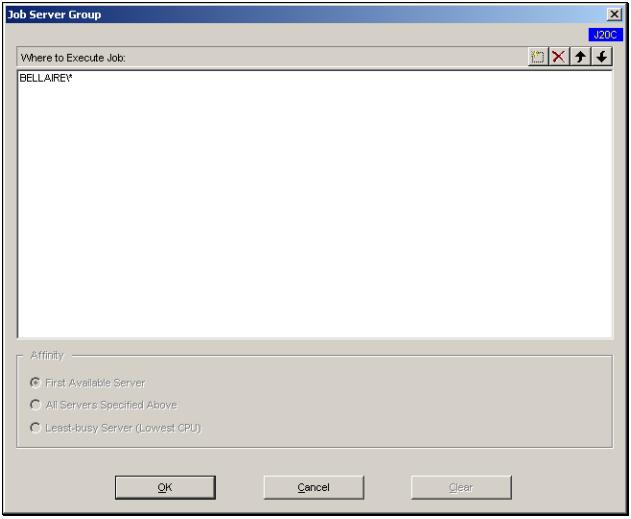
First Available Server – Executes the job on the first started open queue on the first running server in the given list..
All Servers Specified Above – Executes the job on all the servers/ queues listed. This means that multiple instances of the job will run, one for each server/queue listed. Running a job with this option requires that the job be able to run on each of the servers. Use Universal Naming Convention (UNC) paths for job files, and be sure that all resources required by the job are available on all servers.
Least-busy Server (Lowest CPU) – Executes the job only once, but on the node with the lowest CPU load at the time of submission. This type of affinity can be used for balancing job loads across multiple servers.
Limits

The Limits tab allows a variety of limits to be imposed on job execution. In addition to limiting the time allotted for a task to execute and how many times a task can be executed within a given period, the Limits tab also offers provisions to issue notifications (Alerts) in the event various conditions are met.
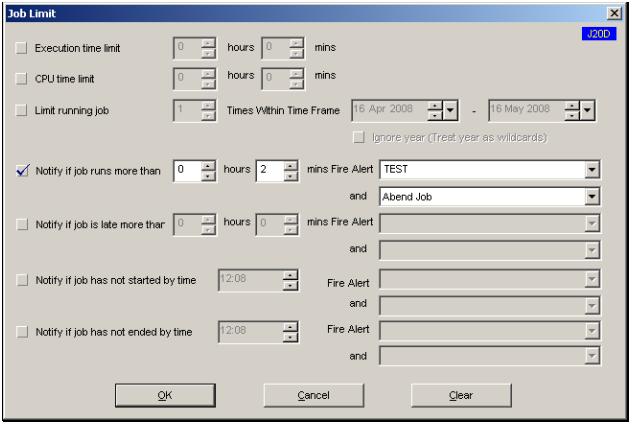
Execution restrictions include:
Execution time limit – Limits the maximum execution time for a job
CPU time limit – Limits the maximum CPU time allowed for a job
Limit running job – Limits how many times a job can be run within a specified time frame (starting and ending dates).
Notifications include:
Notify if job runs more than – Issues an Alert if a job takes longer than a specified time.
Notify if job is late more than – Issues an Alert if a job is late by a specified time.
Notify if job has not started by – Issues an Alert if a job has not executed by a specified time.
Notify if job has not ended by – Issues an Alert if a job has not completed by a specified time.
Advanced

The Advanced tab in the Job Template definition window offers further configuration options.
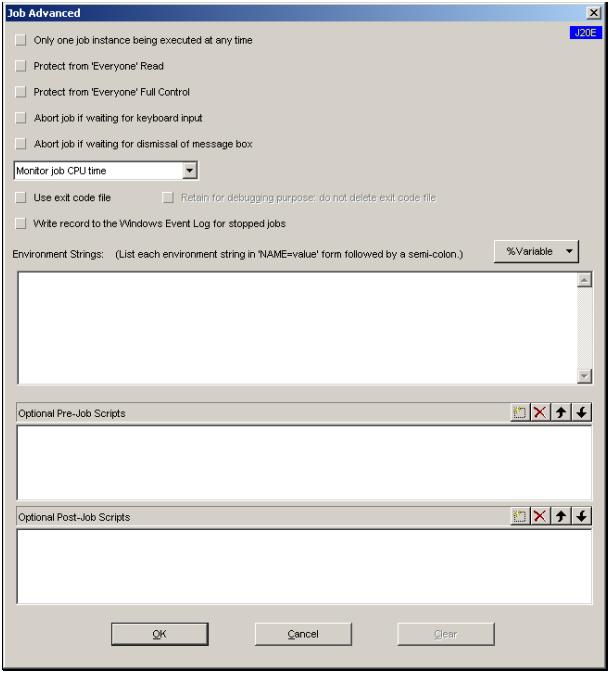
Only one job instance being executed at any time – Only one instance of a job is permitted to execute. This prevents inadvertent overlapping of processes.
Protect from ‘Everyone’ Read – Prevents unauthorized accounts from viewing the job definition by removing the Read permission from the Everyone group.
Protect from ‘Everyone’ Full Control – Prevents unauthorized accounts from administering the job definition.
Abort job if waiting for keyboard input – This option instructs the queue engine to monitor the job for any pauses that are due to the program waiting for keyboard entry. To use this option, the job must be a 32-bit console application.
Abort job if waiting for dismissal of message box – This option instructs the queue engine to abort the scheduled job if it is waiting for message box for dismissal.
Caution: any pop-up error messages, or dialog boxes that are generated by the job will not be detected by this method.
Do not Monitor Job CPU Time – Normal Queue Engine jobs are monitored directly by the queue engine’s launcher program however, such close supervision may cause some applications to perform badly. To avoid such execution problems, the queue engine has the capacity to allow jobs to be submitted without CPU time monitoring. In some cases, processes – such as BCP in MS SQL Server – may run faster in the “No Monitor Environment”. However, disabling monitoring of the CPU time usage means the queue engine cannot report CPU usage back to the Scheduler.
The Do not Monitor Job CPU Time option – in the Advanced tab – effectively overrides the CPU time limit option found in the Limits tab.
Use exit code file – Exits codes are written to an exit code file on termination. Exit codes are based on the output of the job process. Some job processes or applications have internal error codes but do not pass these to the environment as exit codes. The exit code file provides a way for these codes to be extracted from the batch job by creating a file name that both the batch job and the Scheduler are aware of. Then the batch job process can write an error code to this file, and the Scheduler can read the file and use this code as the exit code for the batch job.
As an example: Visual Basic has extensive error codes internally, but does not use these error codes as exit codes. A Visual Basic batch job may encounter a severe error internally, and still complete with an exit code of “0”. The following code fragment can be added to the error handler in the Visual Basic app so that its internal error levels, which are defined by the object Err.Number, are communicated to the Scheduler
ErrorHandler:
Dim strExitCode As String
strExitCode = Environ$(“TABF_EXIT_CODE_FILE”)
Open strExitCode For Output As 1
Write #1, Err.Number
Close #1
End Sub
Retain for debugging purpose; do not delete exit code file – The exit code file is retained for later use. Normally, the exit code file is deleted and this is preferred since many files may be created. This setting causes the scheduler to leave the file intact so that – if the batch job is not writing to the file correctly – it can be debugged.
Write Record to W200x Event Log for Stopped Jobs – Optional switch to log stopped jobs notification to the W200x Event Viewer’s Application Log.
Optional Pre-Job Scripts – Optionally, one or more scripts can be defined for execution prior to running the job.
Optional Post-Job Scripts – Optionally, one or more scripts can be defined for execution after to running the job.
Dependencies

Job Dependencies ensure a previous job has completed as expected or a condition has been met prior to running a job.
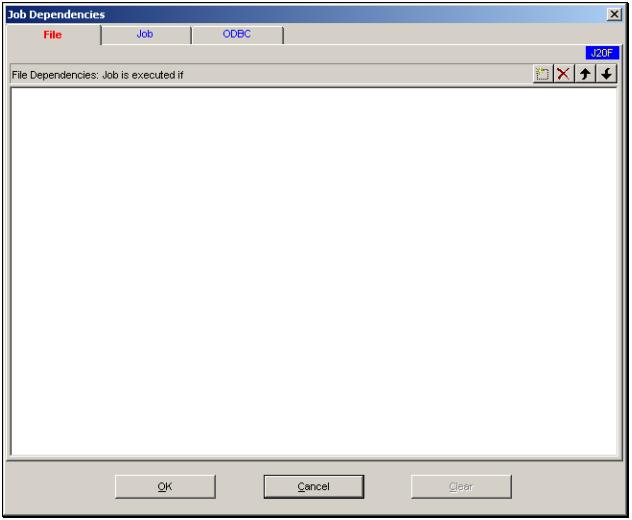
File Dependencies for job – If selected, a file must be present (and optionally has not been modified in XX minutes ) before executing the job.
Job Dependencies for job – If selected, a job must have completed with an expected exit code within the past XX minutes.
ODBC Dependencies for job – If selected, a ODBC database query must return an expected value prior to running the job.
Post Job

The Argent Job Scheduler can take actions based on events related to an individual job. Actions include email and pager notification, network pop-up messages, execution of specific commands, or simply ringing the system bell. These notifications are defined in the Post Job and the Limits definitions.
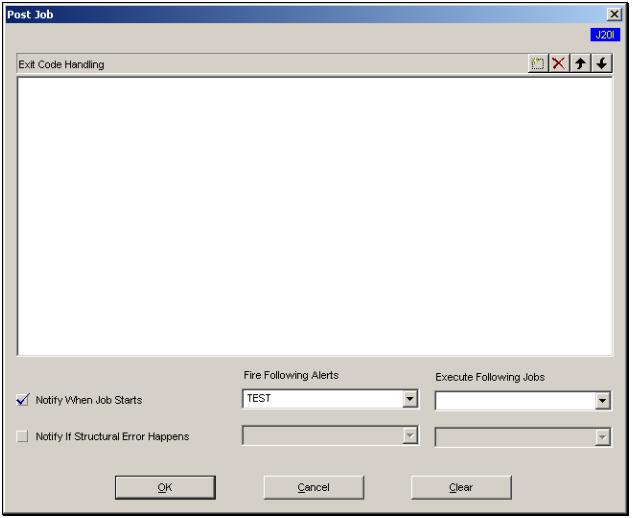
In the Post Job Dialog, five response options are available as notifications.
Notify When Job Starts – If this option is selected, when a job begins, two responses can be defined as:
-
Fire Following Alerts – Fire an Alert when a job starts
-
Execute Following Jobs – Execute another job when a job starts
And Optionally…
Notify if Structural Error Happens – If this option is selected, when a structural error occurs, two responses can be defined as:
-
Fire Following Alerts – Fire an Alert when a structural error occurs
-
Execute Following Jobs – Execute another job if a structural error occurs
And Optionally…
The fifth, and most important, response option is the Exit Code Handling option:
Exit Code Handling
Besides the generic actions that the Argent Job Scheduler can take when a job begins or ends, the Argent Job Scheduler can be used for more complex decisions based on the condition codes returned by the job process.
Exit Code Handling can be used to look for either a specific number from the exit code, or for an exit code that falls within a range of numbers. When the testing criteria have been met, the Argent Job Scheduler can then submit another job and/or execute an Alert definition. the Argent Job Scheduler also presents the option of interrogating the condition (exit) code to determine whether the job should be labeled as Failed or Completed.
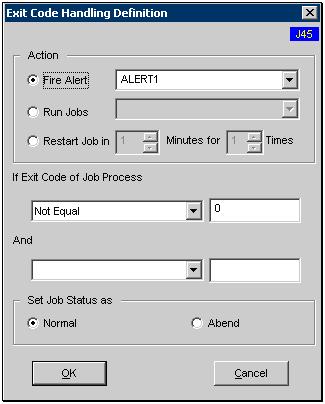
What Is An Exit Code? – An exit code is a number that is returned when a process ends. In batch job scheduling, exit codes are important because they can be used to monitor the results of jobs so that automated decisions can be made. The exit code that is returned by a customer’s job process is independent of the job process itself. Some processes return a simple “0” if the process was successful, and a “1” if it was not. Other programs can have hundreds of discriminating exit codes that are cataloged in their documentation.
(Also See: Creating Exit Code Files Using Argent_CC )
Schedule

The Schedule button shows the schedule for the job and the time zone (i.e., the server) which the scheduling is based on.
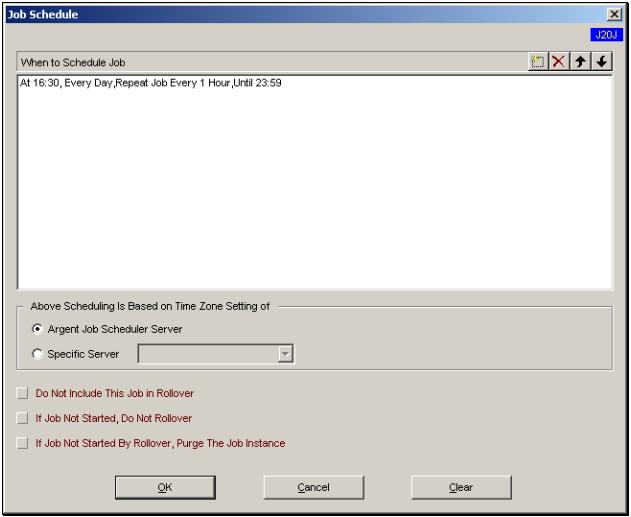
Do Not Include This Job in Rollover – If selected, this job is not included in rollover. While a job is normally submitted automatically at rollover, there are a number of reasons why customers might not want it to be submitted.
The job should not run. Either the job is obsolete, not yet complete, or not ready to be put into production. With this option on, the scheduler ignores the job during rollover.
The job is submitted by another job. Often jobs are grouped into sequences where one job submits another job based on its successful completion. Using this option prevents the job from being added to the schedule by rollover.
If not Started, Do Not Rollover – If selected and the job has not started, the job is not included in rollover. For example: a job is submitted every day at 00:01 that waits for a file (i.e., a file dependency). However, the required file only shows up on some days and not at all on other days. If the job did not have this option enabled, then – when a job waited for a day and was not run – the next day the job would have been submitted again, and, if the file arrives on that day, both instances of the job would run.
If Job Not Started By Rollover, Purge The Job Instance –
If selected and the job has not started by rollover, the job is purged from the job instance.
Note: A single Job Definition, when submitted by a human (ad hoc) or at rollover time (typically midnight for the next day’s job instances), can create multiple job instances. For example, a Job Definition called JOB1 may have a schedule of from 00:00 to 23:58, once an hour, every hour. Thus, one Job Definition< creates twenty-four job instances.